Are you looking for the best exercises for diastasis recti?
You are in the right place.
As an obstetrician and gynecologist, I see a lot of women with diastasis recti regularly.
After doing a lot of research, I have come up with this post which includes:
- A comprehensive list of 100 diastasis recti exercises,
- A workout plan to help you close your abdominal muscle separation, and
- The option to download a PDF with everything in this post!
I have organized the exercises by difficulty.
That way, you can start with gentle exercises and work your way up!
Let’s dive right in!

How To Use This Exercise Guide
I recommend that you begin this exercise program when you are at least 6-8 weeks postpartum. However, you can do some of the exercises sooner.
All of the exercises are broken up into three levels.
Level 1: Beginner
Level 1 is for beginners who are at least 6-8 weeks postpartum, and your medical provider has cleared you to exercise.
Level 2: Intermediate
Level 2 is for intermediate mommas who have mastered the basic level 1 diastasis recti exercises. Before starting these, you need at least four weeks of practice with Level 1 exercises.
Level 3: Advanced
Level 3 is for advanced moms who feel comfortable with most Level 2 exercises. Do not attempt the Level 3 exercises until you have noticed significant improvements in your diastasis separation. Before trying these exercises, you need at least 8-12 weeks of dedicated core training.
Unless otherwise specified, the goal is to perform each exercise for a total of 20 seconds. After 20 seconds of work, take a 20-second break.
As you get stronger, increase the duration to 30 seconds and, ultimately, 40 seconds, followed by 20 seconds of rest.
Pick 1-2 exercises from each of the four categories and perform them two-four times per week.
* It’s important to note that if any exercise causes pain or discomfort, you should immediately stop and seek help from your doctor or physical therapist. Also, if any of these exercises cause a noticeable worsening of your diastasis, you should avoid that exercise. *
Alright, let’s get to the exercises.
Get The Diastasis Recti Exercises PDF
Every exercise you need to know for diastasis recti is right here in this post – but it is a long read. If it’s convenient for you, you can purchase the PDF file for only $7. It has all 100 exercises for diastasis recti, plus a 6 week workout template you can do in the comfort of your home. That way, you can print it out and have all the exercises you need to refer to at any time.
Level 1 Beginner Diastasis Recti Exercises:
All the diastasis recti abdominis exercises are broken up into four categories.
• DR Exercises on your back,
• DR exercise while standing,
• DR exercises on your side, and
• DR exercises on your knees
Within each category, the exercises increase in level of difficulty.
Level 1 Exercises On Your Back
1. DIAPHRAGMATIC BREATHING
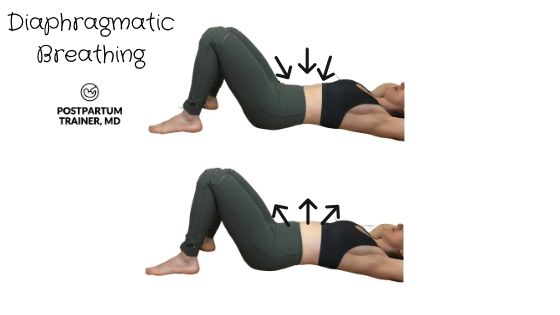
Diaphragmatic breathing is the most fundamental exercise you can perform postpartum. It teaches you how to breathe by using your diaphragm and how to activate your transverse abdominis muscles (the deep core muscles). As simple and low-impact as it seems, it is important that you do not skip this exercise. Sit in a comfortable position with your back straight. Inhale and fill up your abdomen with air. Then exhale by squeezing your ab muscles together. Let each inhale and exhale last 3 seconds. Do not let your shoulders move throughout the movement.
2. ABDOMINAL BRACES
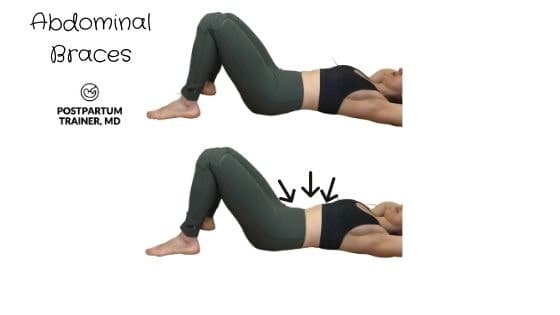
The second exercise I want you to learn is the abdominal brace. This exercise forms the basis for correcting your diastasis. It’s very similar to diaphragmatic breathing, but instead of alternating between deep inhales and exhales – you are going to hold the exhaled position. Start by exhaling, drawing your belly button in, and squeezing your deep abdominal muscles together. Pretend as if you are bracing your abs prior to your baby jumping on your belly. Also, squeeze your pelvic floor muscle at the same time. Hold this contraction for 5 seconds, then release. Repeat five times.
3. POSTERIOR PELVIC TILT
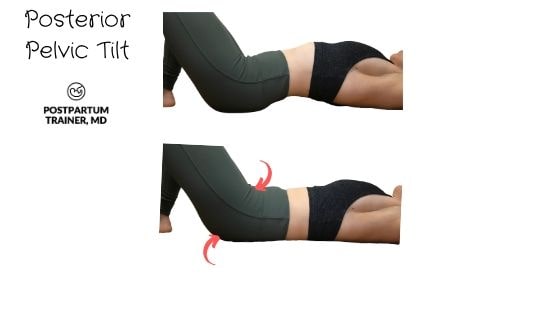
The posterior pelvic tilt is the second most important component for diastasis recti training. New moms must learn how to do this exercise before doing any other exercise. This is how you will train your transverse abdominis in every single exercise moving forward. It will also help you activate your pelvic floor muscles and can prevent lower back pain. Lie on your back with your knees bent and feet flat on the floor. Next, push your belly button down toward the floor to completely flatten out your low back against the ground. This will naturally rotate your pelvis (tailbone) into a neutral position. There shouldn’t be any arch in your low back. Hold this position for 5 seconds and release. Repeat five times, and do not hold your breath.
4. SUPINE BALL SQUEEZES
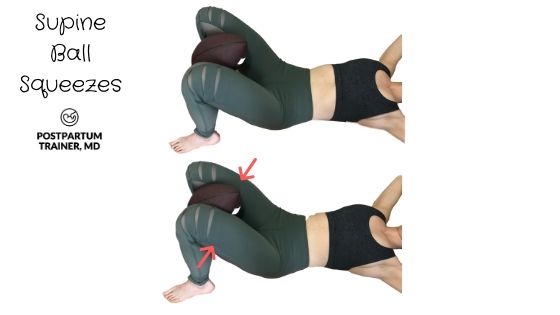
The supine ball squeeze exercise will teach you how to activate your inner thigh and pelvic muscles while engaging your deep core muscles. This exercise is important because it sets the foundation for learning how to activate multiple muscle groups at once. Lie on your back with your knees bent and feet flat on the floor. Place a ball, a folded pillow, or a cushion between your knees. Next, activate your transverse abdominals by bracing your core and tilting your pelvis posteriorly. Then, squeeze the ball in between your knees, and hold this contraction for 3 seconds. Release and repeat for eight repetitions.
5. BANDED HIP ABDUCTIONS
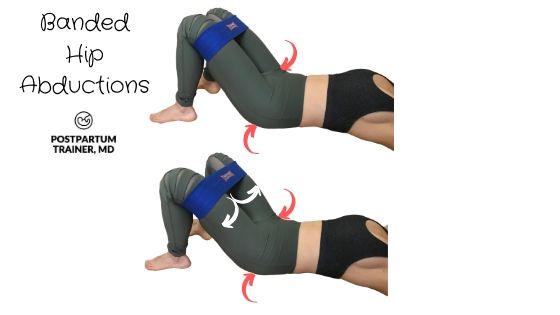
The band hip abduction will train your outer legs and glute muscles while activating your core. To perform this exercise, you will need a glute resistance band. You can purchase them here. Place the band around your knees and lay flat on your back. Brace your core and perform a posterior pelvic tilt. Next, spread your knees apart and hold this position for a three count. Relax and repeat for eight repetitions.
6. HEEL SLIDES
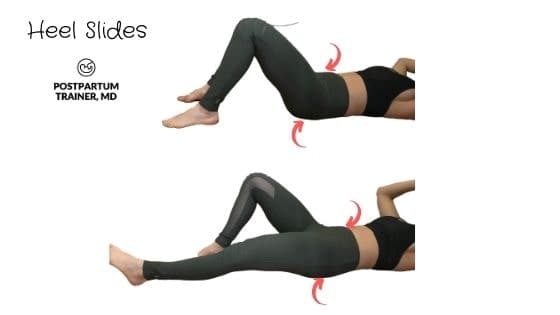
Now you should feel comfortable with the pelvic tilt and abdominal brace. These two movements will form the basis for all of the remaining exercises in this guide. To do the heel slide, lie on your back with your knees bent and feet flat. Tilt your pelvis posteriorly and then slide one heel on the floor until you straighten that leg. Make sure that your low back remains completely flat throughout the entire exercise. Alternate between each leg.
7. SINGLE-LEG MARCHING
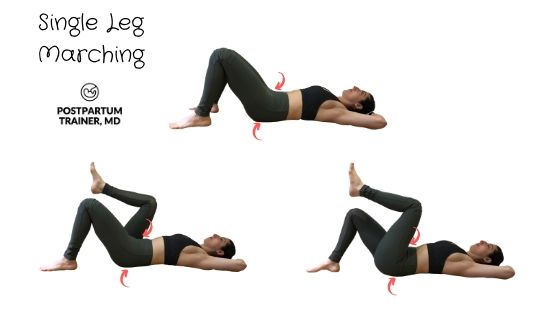
The next exercise is marching. Lie on your back and position your pelvis as you’ve been. Next, bring one knee up toward your chest and slowly lower it back down. Repeat with your opposite leg. Keep your low back flat against the floor throughout the entire exercise. If you need to, you can reset your pelvis back into the neutral position between repetitions. Just make sure to go back into a posterior tilt before starting the next rep.
8. SINGLE LEG HEEL TAPS
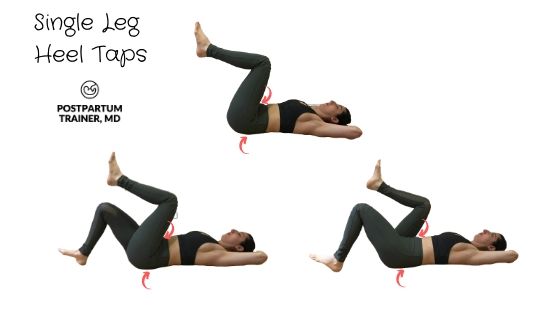
Single-leg heel taps are similar to the marching exercise. The difference is that you will begin with your knees bent up toward your chest and feet off the floor. Posteriorly tilt your pelvis, and slowly lower one leg until your heel touches the ground. Keep your knees bent the entire time. Bring that leg back up toward your chest and repeat with your other leg. If you need to, you can reset your pelvis back into the neutral position between repetitions. Just make sure to go back into a posterior tilt before starting the next rep.
9. THE BENT KNEE DEAD BUG
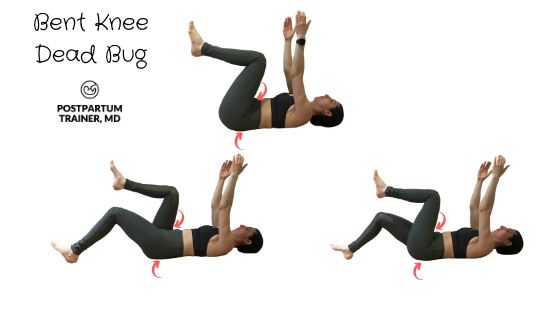
The next exercise is the bent knee dead bug. Lie on your back and bend your knees up to 90 degrees and lift your hands up in the air. From here, tilt your pelvis posteriorly and maintain this position the entire time. Next, extend both arms overhead while bringing one leg down towards the floor. Make sure to keep both knees bent the entire time. Hold this position for a one count and return back to starting position.
10. BENT KNEE PULL-OVER
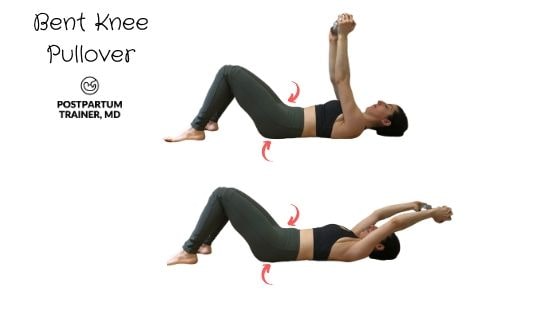
The pull-over exercise requires the use of a dumbbell or some form of external weight. Lie on your back with your knees bent and your pelvis tilted posteriorly. Grab a dumbbell and lift it straight up toward the ceiling with both hands. From here, bring the dumbbell down to the ground with your arms overhead. At the bottom position, your arms should be parallel to the ground. Try to keep your elbows straight throughout this exercise, and do not let your low back come off of the ground. Hold for a one count and return to the starting position.
11. LYING KNEE DROPS STRAIGHT KNEE
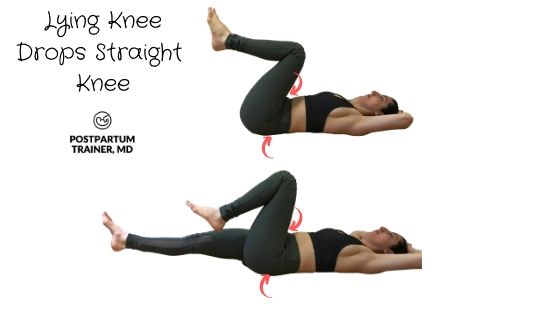
The next exercise starts in the same position as the single-leg heel taps. But this time, you will extend your knees. Bring your knees to your chest with your feet off the ground. Make sure your pelvis is in a posterior tilt. From here, start to lower one leg slowly until it is fully extended and just above the floor. Do not let your heel touch the ground. Slowly come back to the starting position and repeat with the other leg.
12. LYING SINGLE LEG LIFTS STRAIGHT KNEE
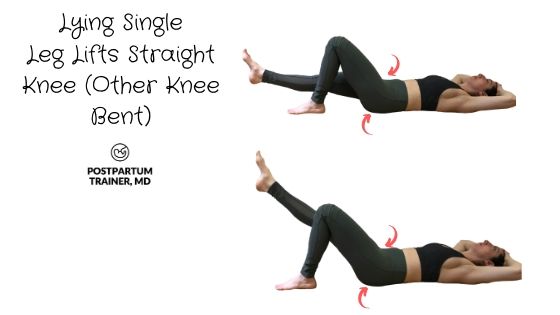
This exercise is the opposite of the lying knee drop. Start by lying flat on your back with one knee bent and your other leg extended. Posteriorly tilt your pelvis and slowly raise your extended leg until it reaches a 45-degree angle to the floor. Slowly lower your leg back down toward the ground. Keep your low back flat on the ground the entire time.
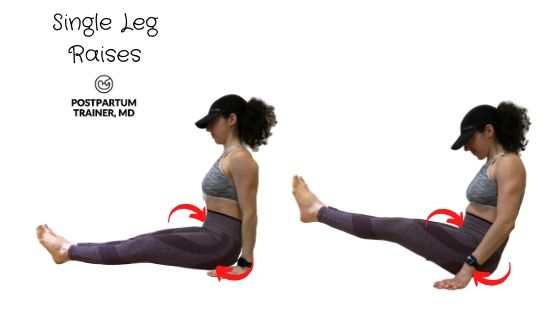
13. SITTING SINGLE-LEG RAISES
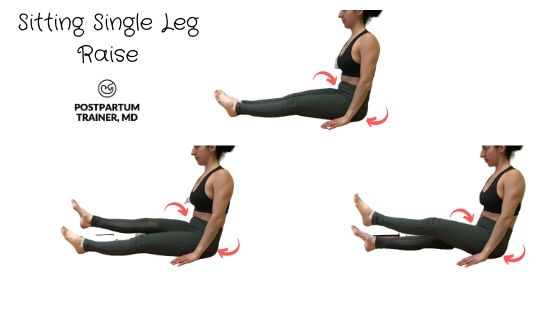
The last exercise in this section is a bonus exercise. This one is performed in a sitting position. Sit with your legs extended out in front of you and your back straight. Place your palms on the floor by your thighs for support. Next, lift one leg straight up to the sky as high as you can without bending your knee. Hold this position for a one count, and return back to the starting position. Repeat on the other side for a total of 10 repetitions per leg.
Level 1 Exercises While Standing
14. STANDING BALL SQUEEZE
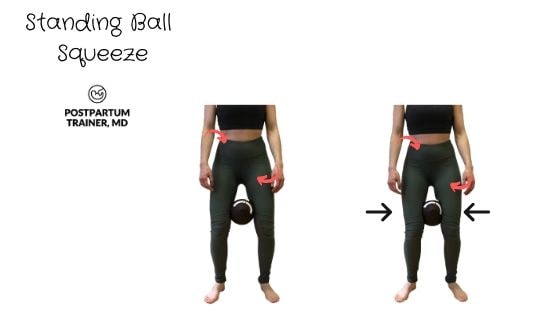
To kick off the standing exercises, we will do a ball squeeze. This exercise is similar to the ball squeeze that you did while you were on your back. This time you will perform this exercise while standing. Place a ball, a folded-up pillow, or a cushion in between your knees and stand up tall. Brace your core and squeeze the pillow in between your legs. Hold this position for three seconds. Relax and repeat.
15. TREE POSE
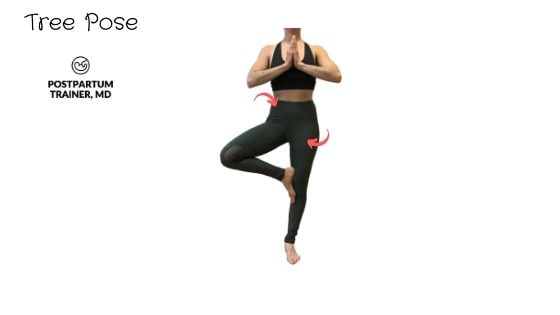
The tree pose is a great yoga exercise that helps improve your balance, activates your leg muscles, and challenges your core. Stand with your feet close together and your hands up by your chest. Brace your core, then pick up one foot and place it flat against the inside of the opposite knee. From here, you can bring your arms overhead into a “Y” shape to increase the difficulty of the exercise. Hold this position for time.
16. WALL SIT
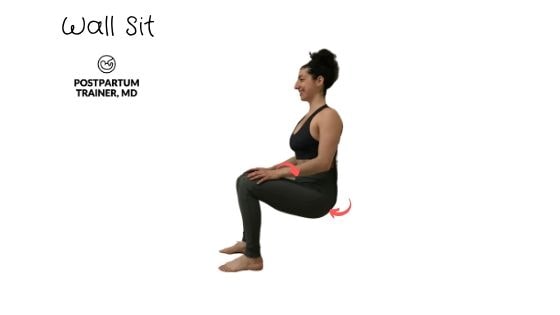
The next diastasis recti standing exercise is the wall sit. This is an effective way to strengthen your deep abdominal muscles as well as your quads, glutes, and hamstrings. Stand ~12 inches away from a wall with your feet shoulder-width apart. Lean back so that your head, upper back, and buttocks are in contact with the wall. From here, posteriorly rotate your pelvis to flatten out your low back against the wall. Next, squat down to a comfortable depth and hold this position.
17. WALL PUSH-UP SHOULDER TAPS

The next standing core exercise is the wall push-up shoulder tap. Face a wall and stand at least 12 inches away. Set your stance shoulder-width apart and place your outstretched hands against the wall. Next, brace your core and go into a posterior pelvic tilt. From here, take one hand off the wall and touch your opposite shoulder while maintaining the posterior tilt. Repeat with your other hand, and then perform a push-up. This exercise is great for learning how to activate your upper body muscles while bracing your core. To make this exercise more challenging, step further away from the wall.
18. WALL MOUNTAIN CLIMBERS
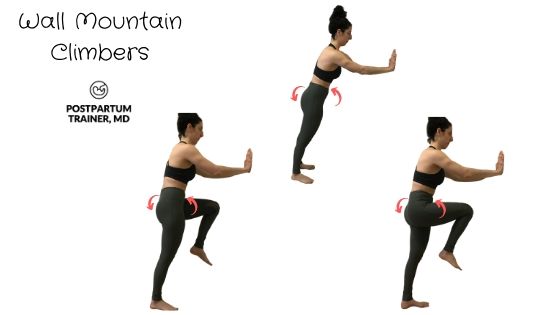
The wall mountain climber is another great core exercise that will help strengthen and activate several muscle groups in your core. Stand at least 12 inches from a wall and place your outstretched hands against the wall to support yourself. Next, brace your core and tilt your pelvis posteriorly. Then, bring one knee up towards your chest as high as you can without letting your spinal alignment change. Do not round your back or rotate your hips. Slowly lower that leg and repeat on the opposite side. To make this exercise more challenging, step further away from the wall.
19. STANDING BICYCLE
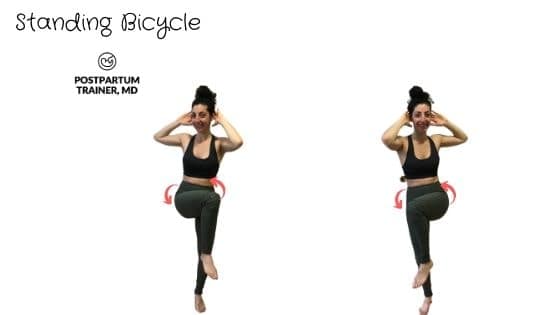
The standing bicycle is a simple exercise that trains your oblique muscles without excessive trunk rotation. Stand with your feet shoulder-width apart with your arms up by your head. Brace your core and start bending one knee up toward your chest. At the same time, take your opposite arm and bring your elbow down toward your knee. Do not make contact between your knee and elbow. Do not flex your torso down. You only want to rotate slightly towards the knee. The majority of the movement should come from your hips and knees.
20. FARMER CARRY
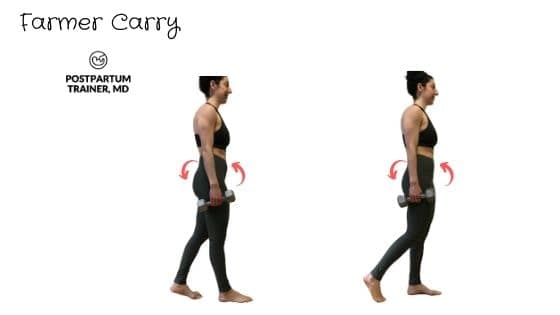
These next two exercises will teach you how to activate your core while walking. The farmer’s carry is a simple way to strengthen the oblique muscle (sides of your core) without twisting or bending. All you have to do is pick up a dumbbell or some type of weight and carry it on one side. This will present an uneven load to your core which activates the oblique muscle. The purpose of the exercise is to resist bending laterally as you are walking. As always, keep your core braced as you are doing the exercise. Be sure to work both sides equally. Walk for a set distance (~25 steps) or for time (~20 seconds) and switch sides.
21. WAITER CARRY
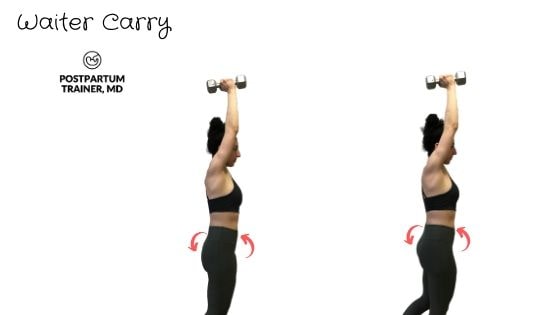
Similar to the farmer carry, the waiter carry will present an uneven load on your core. Instead of holding the weight down by your side, you will hold it up overhead. The rest of the exercise is the same. Walk at a comfortable pace and keep your core tight and your spine neutral. Walk for a set distance (~25 steps) or for time (~20 seconds).
Level 1 Exercises On Your Side
22. MODIFIED SIDE PLANK
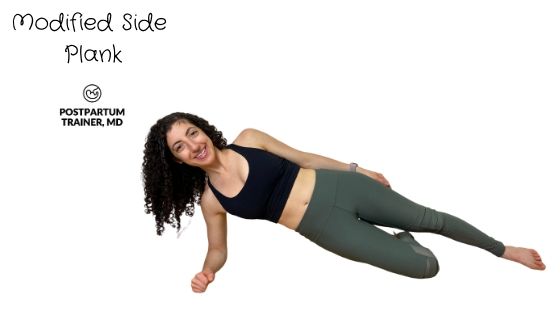
The first exercise in this sequence is the modified side plank. This exercise is great for training the endurance of the oblique muscles. Lie on your side and prop yourself up on your elbow to support yourself. Keep the knee of your bottom leg bent and in contact with the floor. Extend your top leg and place that foot on the ground for balance. Make sure that you keep your back and hips as straight as possible. Hold this position for 10-15 seconds on each side.
23. CLAMSHELLS
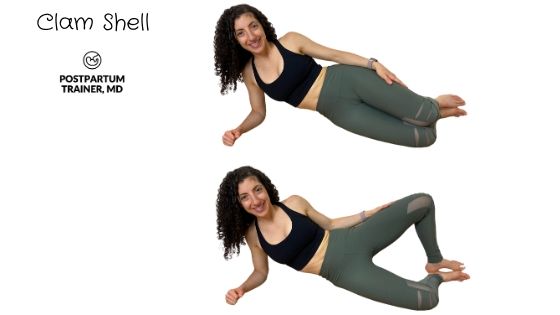
The clamshell is similar to the hip abductions, but instead, you will be focusing on keeping your core stable while doing hip external rotations. Assume a modified side plank position with both knees bent. From here, begin externally rotating your top knee up toward the ceiling while keeping your heels together. This exercise will target the external rotators in your glutes while activating your core. The clamshell exercise is much more effective when using a hip circle around your knees, which you can get from Amazon.
24. MODIFIED SIDE PLANK DIPS
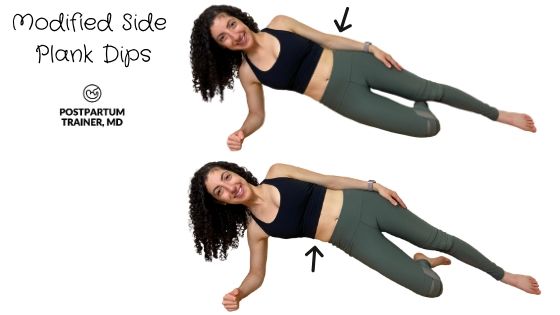
For this next exercise, you will assume the same modified side plank position as before. Next, you will pulse your hips up and down in a slow, controlled manner. The movement does not need to be excessive. Go for 8-10 repetitions per side.
25. MODIFIED SIDE-LYING HIP ABDUCTION
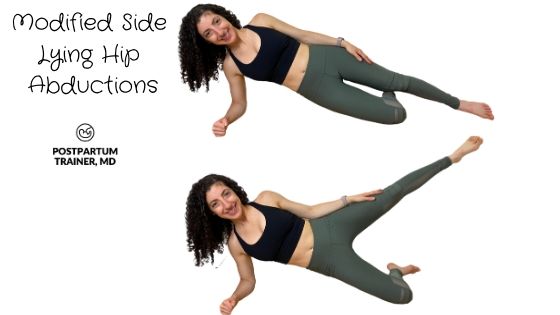
The side-lying hip abduction will teach you how to use your leg muscles while activating your obliques. Get into a modified side plank position to start. Next, lift your top leg as high as you comfortably can and return to the starting position. Keep your core engaged throughout. Do eight repetitions per side.
26. Modified Side-Lying Hip Adduction
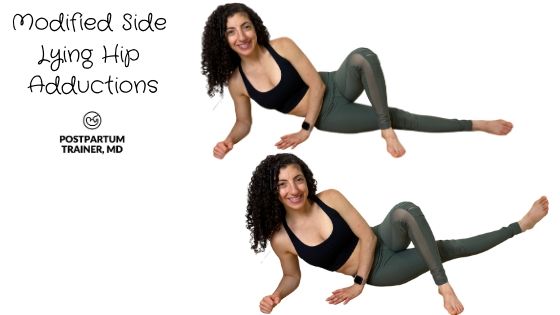
The next exercise is side-lying hip adduction. It’s similar to hip abduction, except you will bend the knee of the top leg, cross it in front of your body, and place your foot on the ground. You will then straighten the bottom leg. Next, activate your core, and raise your bottom leg as high as you comfortably can. The range of motion may not be that great initially. Do eight repetitions per side.
27. INCLINE SIDE PLANK
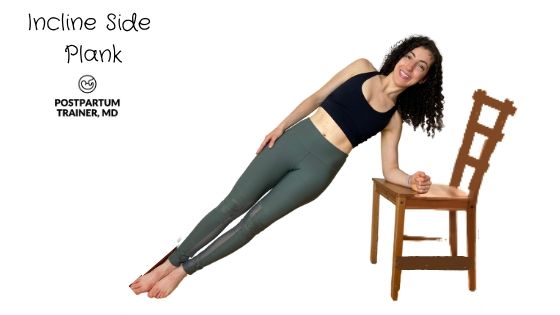
This last exercise of this segment increases the demands of the modified side plank. Find a chair or a bench that you can lean against. Place one elbow against the bench and assume a full-side plank position with your legs straight. Keep your core engaged and your spine neutral. To make this exercise easier, stagger your stance. Hold this position for 10-15 seconds.
Level 1 Exercises On Your Knees
28. THE SCARED CAT
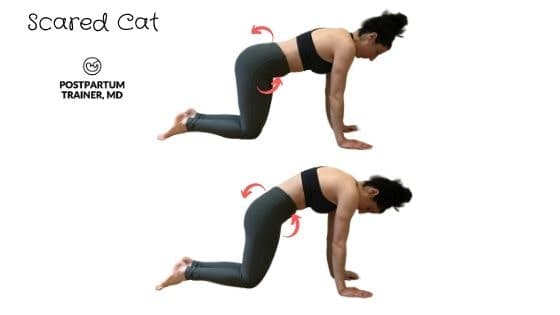
This exercise teaches you how to brace your core from a prone position. To perform the scared cat, get into a quadruped/tabletop position (on your hands and knees with your back flat). From here, you will draw your stomach muscles in and posteriorly tilt your pelvis. The movement is subtle, and your back will round a bit. Hold this position for a three count and release.
29. QUADRUPED ARM RAISES
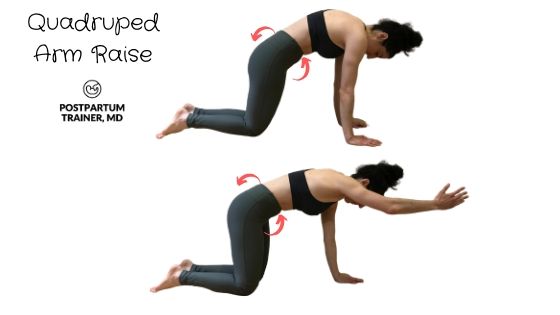
The quadruped arm raise adds another layer of balance to the scared cat exercise. To do it, start by performing a scared cat repetition. Next, raise one arm straight out in front of you. You are now forced to balance yourself on 3 points of contact rather than 4. Hold this position for a three count and repeat with your other arm. Perform eight repetitions on each side.
30. QUADRUPED HIP EXTERNAL ROTATIONS
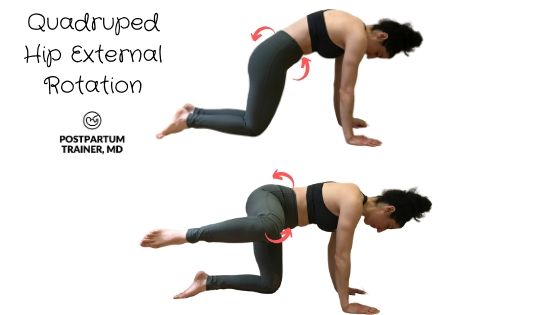
This next exercise will teach you how to brace your core from a prone position while activating your hips and glute muscles. Assume a quadruped position with a tight core and a flat back. From here, begin rotating one knee directly out to your side until your inner thigh is parallel to the ground. Only go as high as you can maintain your core and back position. Return to the starting position and repeat for eight repetitions per side.
31. QUADRUPED HIP EXTENSIONS
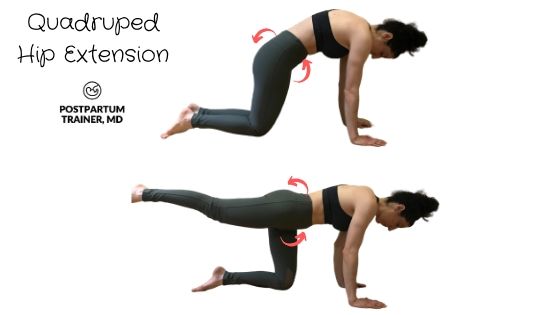
The quadruped leg extension picks up where the scared cat left off. Perform a repetition of the scared cat, and then extend one leg straight back while keeping your core engaged. Similar to the quadruped arm raise, this exercise increases your balance and coordination. Return to the starting position and repeat on the other side. Do eight repetitions per leg.
32. HALF-KNEELING LIFT AND CHOP
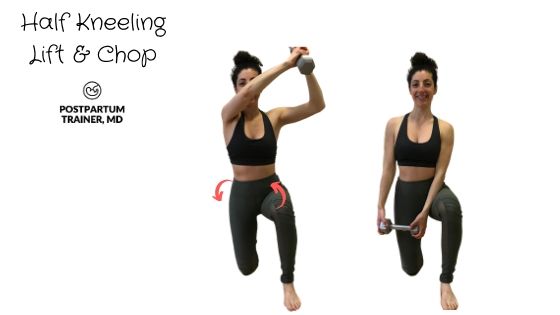
The kneeling lift and chop is a great exercise to teach you how to engage your core while rotating your trunk slightly. Get into a half-kneeling position and grab a dumbbell with both hands. Hold the dumbbell on the side that you are kneeling on. Next, brace your core, and lift the dumbbell up and across your body so that it is above your opposite shoulder. Slowly return the dumbbell back to the starting position. Do eight repetitions per side.
Okay, so that wraps up Level 1.
The following exercises kick off Level 2!
Level 2 Intermediate Diastasis Recti Exercises:
Alright, you are doing great! By this point, you should feel comfortable engaging your core muscles during a wide variety of movements.
Practice the level 1 exercises for at least four weeks before moving on to the intermediate level 2 diastasis recti exercises.
Level 2 Exercises On Your Back
33. GLUTE BRIDGE
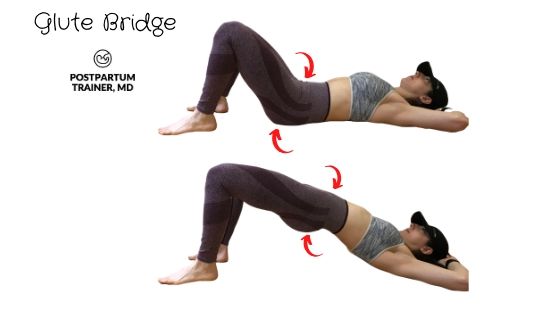
The glute bridge is the first diastasis recti exercise that you will perform on your back for level 2. It is one of the most fundamental exercises for teaching hip extension while bracing your core. As always, start each repetition with a posterior pelvic tilt. From here, squeeze your butt muscles hard to extend your hips. Hold the top position for 3 seconds and go back down. Aim for 8-10 repetitions.
34. THE DEAD BUG
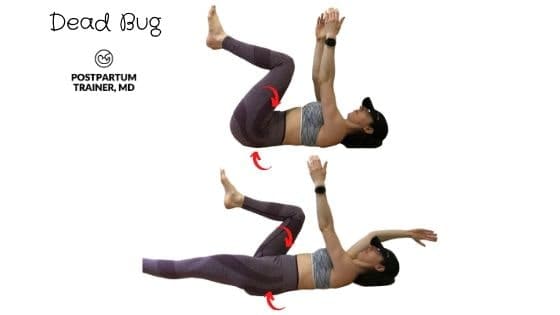
The next exercise on your back is the dead bug. It’s the same as the bent knee dead bug, except you will extend your leg at the bottom position. Lie on your back and bring your knees up toward your chest and your hands up in the air. Start by tilting your pelvis posteriorly. Next, extend one arm overhead while extending the opposite leg out towards the floor. Hold this position for a one count and return back to the starting position.
35. MODIFIED HOLLOW BODY HOLD
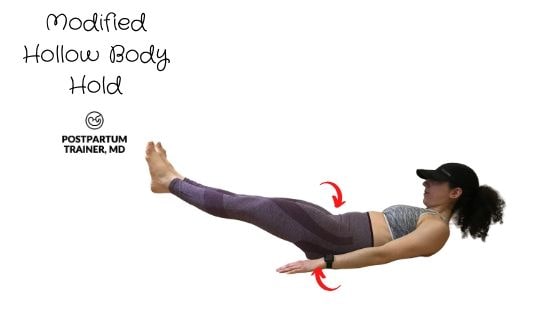
The hollow body hold is one of the best exercises for strengthening the entire core. As simple as it looks, you will be humbled by how difficult it actually is. To start, perform a pelvic tilt and maintain this position throughout the exercise. Next, extend your legs out and keep your heels close to the ground without actually touching the floor. Then, SLIGHTLY raise your upper back off the floor. Do not exaggerate this, as going too far can place too much intra-abdominal pressure on your rectus abdominis muscles. Hold this position for time.
36. MODIFIED HOLLOW BODY HOLD KNEE TUCKS
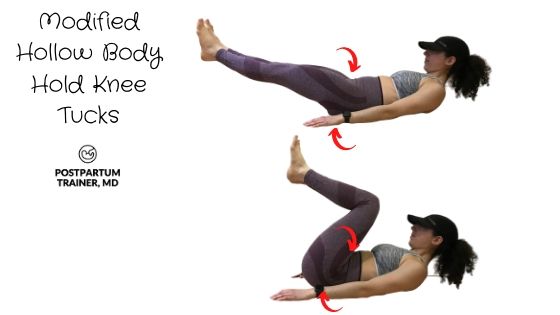
For this next exercise, you will add a dynamic component to the hollow body position. First, achieve a modified hollow body hold. From here, bring your knees up toward your chest slowly, and pause for a one count. Slowly bring your legs back down to the starting position. Do not let your feet touch the ground, and do not let your low back arch.
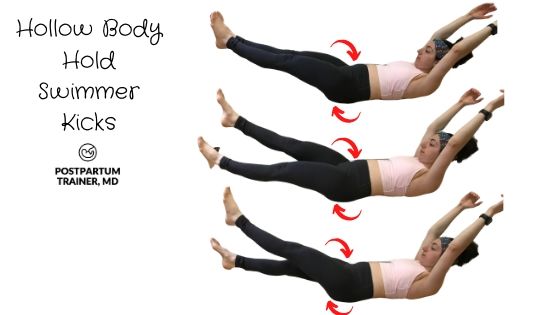
37. MODIFIED HOLLOW BODY HOLD SWIMMER KICKS
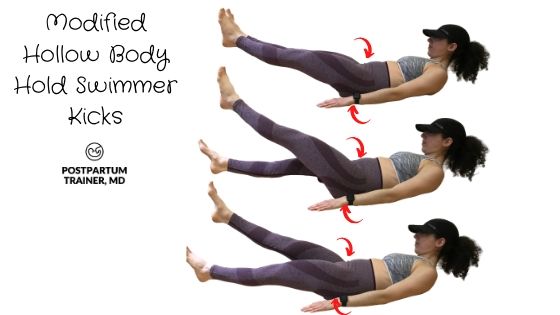
Next is the hollow body swimmer kick. Assume a hollow body position with your hands at your sides. Next, begin raising one leg slightly above the other while keeping your knees straight. As you start to lower the first leg, begin raising the other leg. Continue alternating, raising, and lowering each leg as if you were swimming. Do not exaggerate the motion, and never let your low back arch.
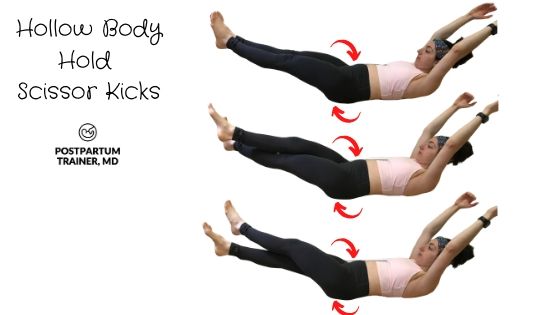
38. MODIFIED HOLLOW BODY HOLD SCISSOR KICKS
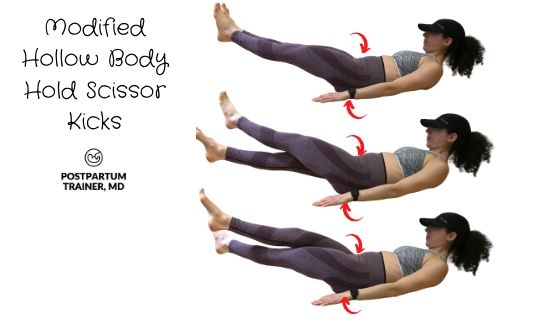
The hollow body exercises continue with the scissor kicks. Similar to the swimmer kicks, you will be abducting and adducting your legs. Instead of up and down, you will cross them side to side, as shown below. This exercise will challenge your core and activate your inner and outer thighs simultaneously. Keep your low back flat on the ground at all times.
39. MODIFIED HOLLOW BODY LEG RAISES
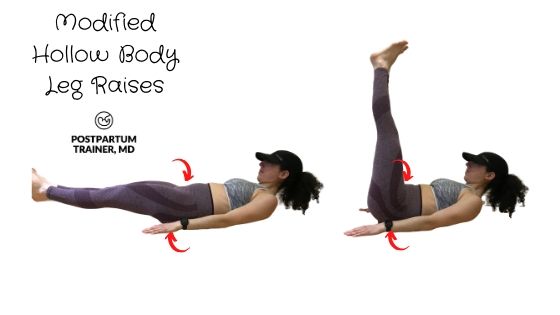
You have already done a similar exercise to the leg raise before, but this time, you will raise both legs together. From a hollow body position, bring your legs up towards the sky while keeping your pelvis posteriorly tilted. Keep your knees straight, and do not let your heels touch the ground. Try to get your legs up to 90 degrees. As always, make sure that your low back stays completely flat on the ground throughout the entire exercise.
40. ONE LEG GLUTE BRIDGE KNEE BENT
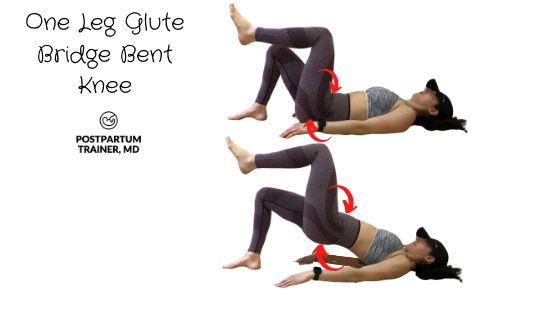
The one-leg glute bridge is the next natural progression of the basic glute bridge. This movement is much more difficult, so it’s important that you take it slow. Lie on your back with your knees bent and feet flat on the floor. Next, bring one knee up towards your chest (this leg will remain elevated for the entire exercise). Proceed to extend your hips after bracing your core and tilting your pelvis. If you cannot maintain a neutral spine with your core engaged, do not attempt this exercise. Do 6-8 repetitions per side.
41. SITTING LEG RAISES
You should be familiar with the single-leg variation of this exercise from level 1. Sit on the floor with your legs extended straight out in front of you. Sit up tall and place your hands on the floor by your mid-thigh. Next, brace your core and lift both legs straight up to the sky. Hold this position for a one count and release. Keep your feet together, your knees straight, and your toes pointing up. To make this exercise easier, move your hands back towards your hips. To make it more challenging, place your hands further down closer to your knees.
Level 2 Exercises While Standing
42. SPLIT STANCE ONE ARM SHOULDER PRESS
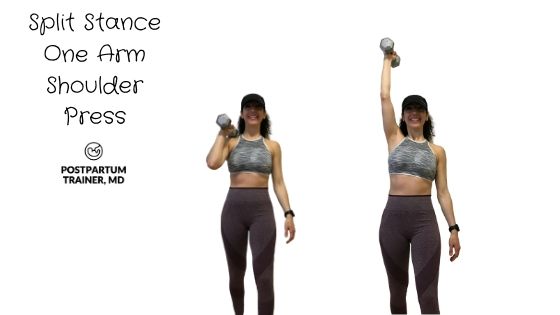
The first standing level 2 standing exercise is the split stance shoulder press. This exercise teaches you how to engage your core while activating several muscles in the upper body. Assume a comfortable split stance position and bring a dumbbell or external weight up toward your shoulder. Next, brace your core and begin pressing the dumbbell straight up overhead. Do not let your back arch or your rib cage flare out. Keep your core tight and engaged throughout the exercise. Repeat for eight repetitions before switching sides.
43. PALLOF PRESS
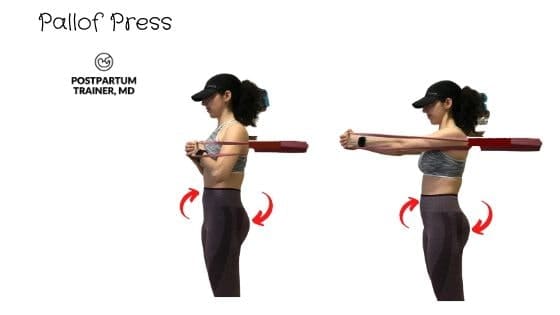
The Pallof press is a great anti-rotation exercise that trains the obliques and transverse abdominis muscles without movement of the spine. To perform the Pallof press, you will need a resistance band. Loop a resistance band against a pole or a beam and interlink your hands on one end. Step away from the pole to place the band on tension. Next, turn away from the pole, as seen in the picture. From here, brace your core and press the band directly out in front of you. The purpose of this exercise is to resist the rotation of your trunk. You can perform this exercise for reps or hold it for time.
44. THE UNEVEN SQUAT
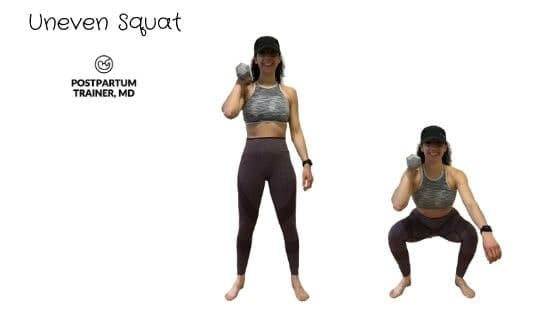
The full range of motion squat is one of the best exercises to teach you how to engage your core while going through a complex movement. To improve the core stability component, I want you to perform the squat with uneven weight. Find one dumbbell or external weight and hold it up by your shoulder. Stand with your feet shoulder-width apart and your toes pointing out no more than 30 degrees. Start by tilting your pelvis posteriorly and bracing your core. Bend at the hips and knees until you reach a squat depth that you are comfortable reaching. Pause for a one count at the bottom and come back up by squeezing your glutes. Keep your back straight and your heels flat on the floor at all times.
To learn more about squatting with diastasis recti, click here.
45. INCLINE PUSH-UP SHOULDER TAPS

The incline push-up shoulder tap is the next progression to the wall push-up. Find a table or a high chair you can lean against with your outstretched arms. Stand shoulder-width apart with your back straight, and posteriorly tilt your pelvis. Next, you are going to tap your contralateral shoulder on each side and then perform a full range of motion push-ups. If this exercise is too challenging, find a taller incline to make it easier. Aim for 8-10 total repetitions.
46. INCLINE MOUNTAIN CLIMBERS
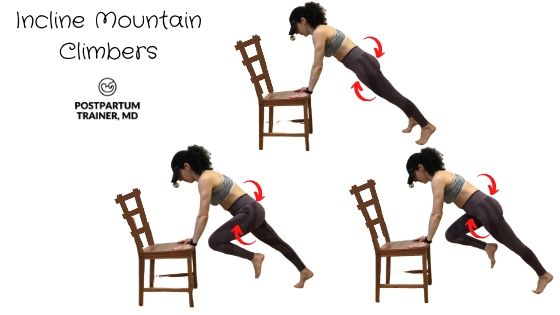
The incline mountain climber is very similar to the wall mountain climber. Find an incline that you can lean against using your outstretched hands. Brace your core, tilt your pelvis, and lift one knee towards your elbow. Slowly lower that leg and repeat on the opposite side. Keep your core engaged, and your pelvis tilted the entire time. Avoid rotation of the hips and rounding of the spine.
47. WALL PLANK
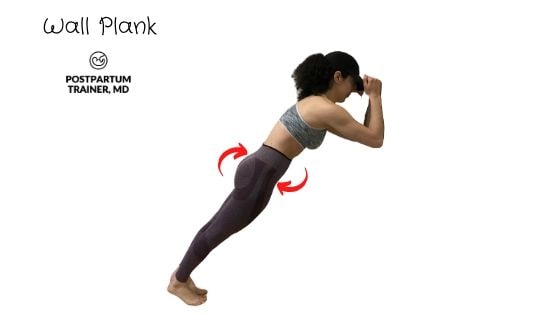
For the final level 2 standing exercise, we are going to perform the wall plank. This exercise is similar to the wall push-up shoulder tap, except you will be on your elbows. Make sure that your pelvis remains posteriorly tilted and keep your core engaged. To make this exercise easier, widen your stance. To make it more challenging, step further away from the wall. If you feel too much pressure on your rectus abdominis muscle while doing this exercise, skip it.
Level 2 Diastasis Recti Exercises On Your Side
48. THE SIDE PLANK
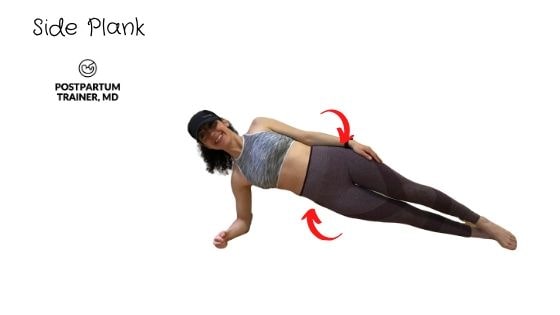
To kick off the Level 2 Exercises on your side – we will do the full side plank. This exercise is the same as the modified side plank, except your bottom leg will also be straight. You can stack your top leg on top of the bottom leg, or you can slightly stagger your top leg either in front or behind the bottom leg. The most important part is that your body is completely straight, and you are activating your core and tilting your pelvis. Hold this position for 10 to 15 seconds and repeat on the other side. To increase the difficulty of this exercise, you can do it from an extended arm rather than on your forearm.
49. SIDE PLANK DIPS
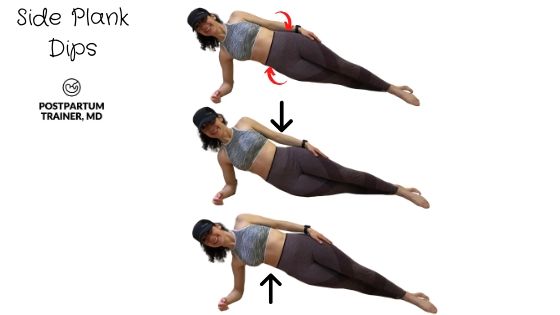
The next exercise is a side plank dip. Instead of holding the isometric position, I want you to pulse your hips up and down in a slow and controlled manner. This adds a dynamic component to the exercise to further strengthen the core and oblique muscles. Aim for eight repetitions per side.
50. SIDE PLANK ROTATIONS
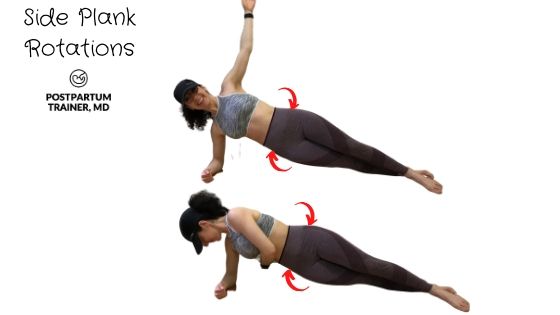
The third exercise is a side plank rotation. To do this exercise, get into a standard side plank position, and bring your top arm up towards the sky. Next, bring the hand down towards the armpit of the opposite arm as if you were trying to reach through and touch your back. Make sure to do this movement in a slow and controlled fashion. Aim for 6 to 8 repetitions per side. As always, keep your core tight and your pelvis tilted.
Level 2 Exercises On Your Knees
51. BIRD DOG HOLDS
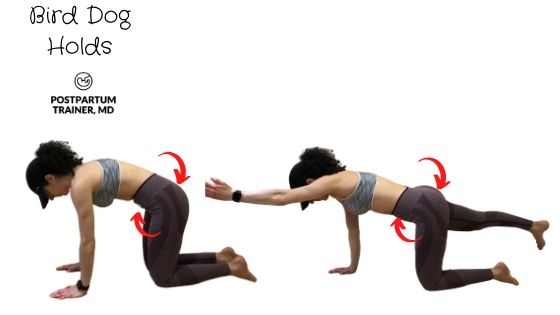
The first level 2 exercise from the quadruped position is the bird dog. The bird dog is similar to the quadruped leg, and arm extension, except you, will be combining the two. From the starting position, extend one leg and the opposite arm at the same time. Hold the top position for a three count. It is important that you keep your core muscles engaged and your pelvis posteriorly tilted. Return your hand and knee back to the floor. Go through the movement slowly and do 6-8 repetitions per side.
52. BIRD DOG CRUNCH
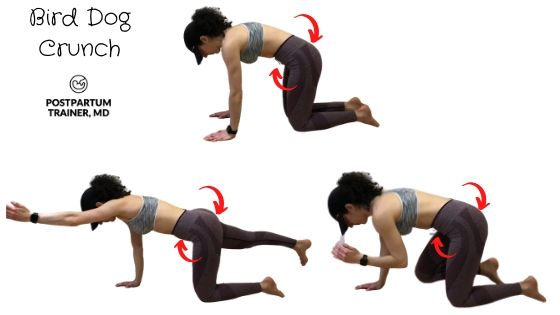
The bird dog crunch adds a dynamic component to the isometric bird dog exercise. In this variation, you never bring your hands or knees back to the floor. Instead, you bring your elbow and knee back toward your midline as if you were trying to make them touch. Don’t worry if you do not make contact. The most important thing is that you do not let the position of your spine change throughout the movement. Do 6-8 repetitions per side.
53. HALF KNEELING SINGLE-ARM PRESS
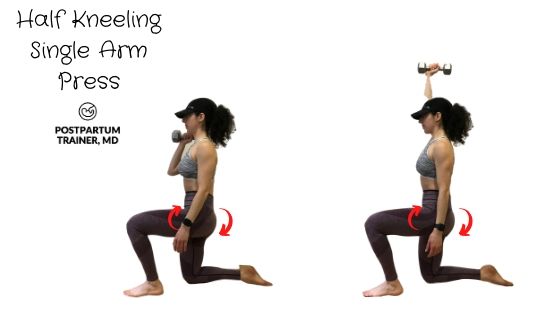
The half-kneeling press is a great way to train your shoulder muscles while learning how to keep your core braced and stable. You will need a dumbbell or some type of external weight to perform this exercise. Assume a half-kneeling position, holding a dumbbell at the shoulder of the non-kneeling side. Keep your spine straight and brace your core. Next, press the weight straight up overhead until your elbow is locked out. Slowly lower the weight back down and repeat for eight repetitions per side.
54. HALF KNEEL TO STAND
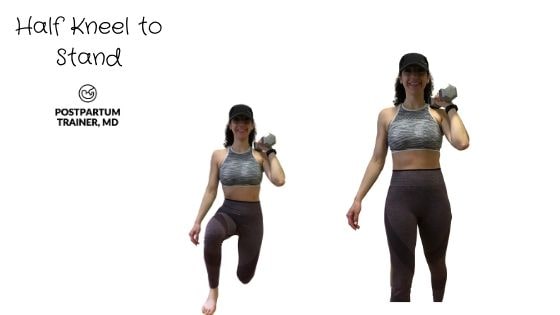
This next exercise will teach you how to stand up and engage your entire body while maintaining a stable core. Assume a half-kneeling position and bring a dumbbell or weight up on the shoulder of the kneeling leg. While maintaining a braced core, stand up slowly without letting your pelvic alignment change. As simple as this exercise looks, don’t underestimate how challenging it may be.
55. HAND WALKS
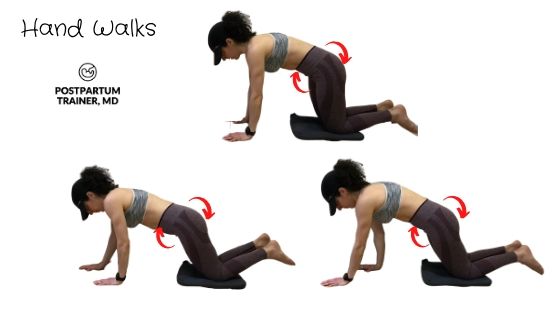
The hand walk is another great exercise that really challenges your core muscles. It’s actually very simple. You will need a small towel that you will place underneath your knees and a floor with minimal friction. Start from the quadruped position with your back straight, core braced, and knees on top of the towel. Next, you will begin walking your hands forward, which will slide your lower body along the floor. Try to keep a 90-degree angle in your lower body, and do not let your hips sag. Keep your core muscles engaged the entire time.
That wraps up all the Level 2 exercises.
Up next is Level 3. Are you ready?
Level 3 Advanced Diastasis Recti Exercises:
If you have made it this far, you are one strong momma. At this point, you should notice a significant improvement in your diastasis separation.
I recommend that you practice the level 2 exercises for at least 4-6 weeks before moving on to the advanced level 3 exercises.
Level 3 Exercises On Your Back
56. PENGUINS
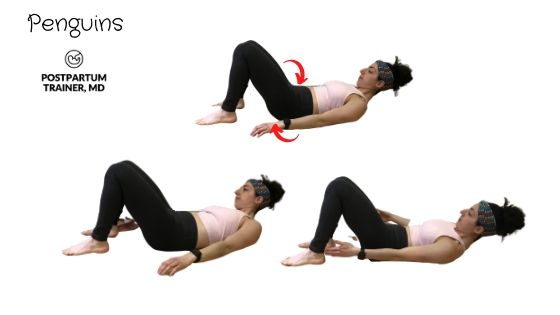
The penguin is a fun exercise you can do once you have developed a comfortable level of strength in your core muscles. That’s because this exercise introduces a side-bending component. Lie on your back with your knees bent and shoulder-width apart. Keep your arms out by your sides and lift your shoulders off the floor. Posteriorly tilt your pelvis and perform a side bend to touch your ipsilateral heel and then return back to neutral. Repeat on the other side.
57. LYING WINDSHIELD WIPER WITH KNEES BENT
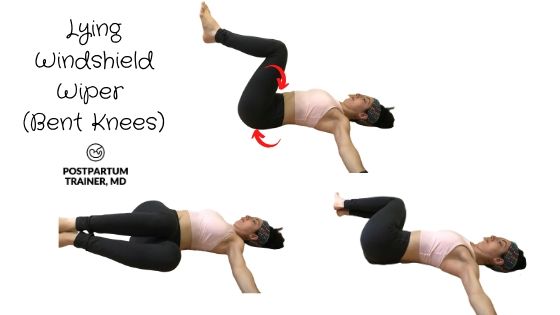
This is the first exercise that introduces a significant rotational component to train the oblique muscles. Assume a posterior pelvic tilt and bring your knees up toward your chest. Next, place your arms out at your sides to help keep your balance. Begin slowly lowering your knees toward one side, allowing your hips to rotate in that direction. Do not let your knees touch the floor. Slowly return to the starting position and repeat on the other side. Do eight repetitions per side.
58. HOLLOW BODY HOLD WITH HANDS OVERHEAD
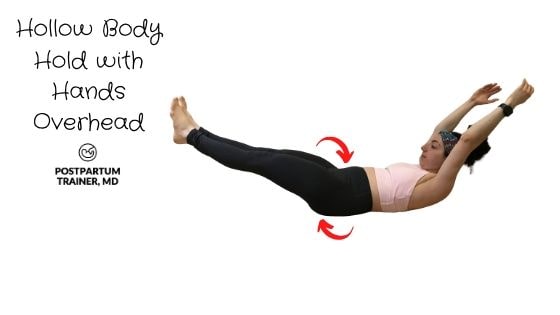
We are back to the hollow body holds. This variation will increase the demands of the hollow body hold from level 2 as you will have to bring your hands overhead. By moving your arms further from your center of gravity, it becomes harder to maintain your low back flat on the ground. If you cannot maintain a flat back, scale the exercise back to an easier variation (i.e. bringing your arms straight up to the sky). Hold this position for 20 seconds.
59. HOLLOW BODY PULLOVER
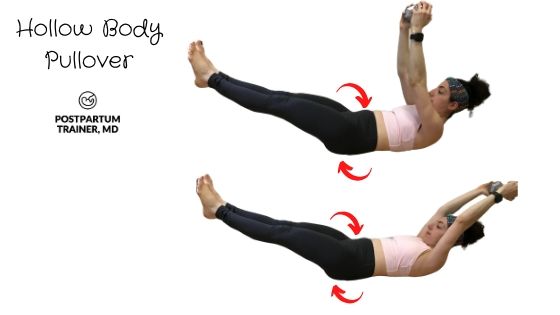
Grab a dumbbell or external weight and assume a hollow body with your arms up toward the ceiling. From here, bring the weight up over your head until your arms are just about parallel to the floor. Keep your elbows as straight as you can. Pull the weight back down toward your abdomen and repeat. Keep your low back flat on the floor, and your core braced.
60. HOLLOW BODY HOLD KNEE TUCKS
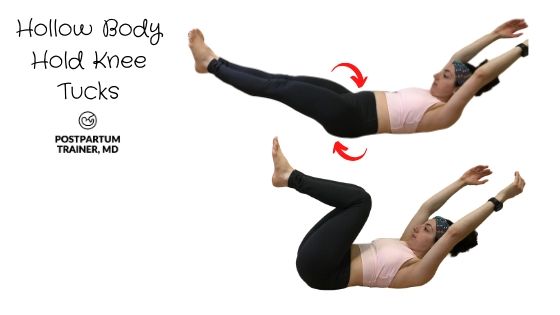
The hollow body hold exercises in level 3 pick up where the level 2 exercises end. From a hollow body, hold with arms overhead, and slowly bend your knees up toward your chest. Pause at the top position for a one count and slowly return back to the starting position. Do not forget that the entire purpose of this exercise is to keep your low back flat on the ground at all times. Go for 8-12 repetitions. Hold a light dumbbell in your hands to make this exercise more challenging.
61. HOLLOW BODY HOLD BICYCLES
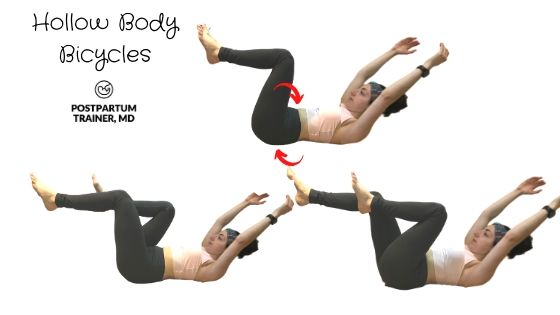
From a hollow body, hold with arms overhead, and slowly bend your knees up toward your chest. From here, slowly begin extending one leg out until it is completely straight. Pause for a one count and slowly return to the starting position. As you bring that leg back, begin extending your other leg. Remember to always keep your low back flat on the ground at all times. Hold a light dumbbell in your hands to make this exercise more challenging.
62. HOLLOW BODY HOLD SWIMMER KICKS
This exercise is the same as the modified hollow body swimmer kicks. But this time, your arms will be overhead, holding a light weight. Keep your knees straight and your low back glued to the floor throughout the entire movement. Do this exercise for 20 seconds.
63. HOLLOW BODY HOLD SCISSOR KICKS
This exercise is the same as the modified hollow body scissor kicks but with your arms overhead holding a light dumbbell. As always, keep your low back flat on the ground at all times. Do this exercise for 20 seconds.
64. HOLLOW BODY HOLD SINGLE LEG RAISES
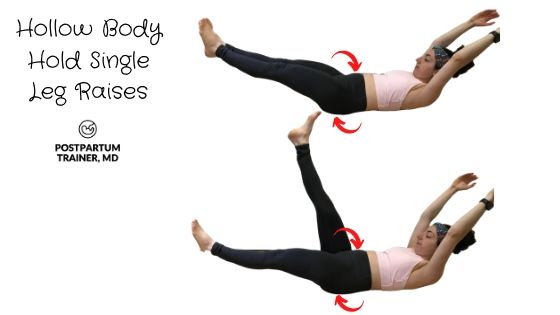
The next hollow body exercise is the single-leg raise. From the hollow body position, flex one leg up toward the sky while keeping both knees straight. Pause for a one count and return back to the starting position. Repeat with the other leg. Only go as high as you can while maintaining the posterior pelvic tilt. Do eight repetitions per side. Hold a light dumbbell overhead to make this exercise more challenging.
65. LYING WINDSHIELD WIPER WITH STRAIGHT KNEES
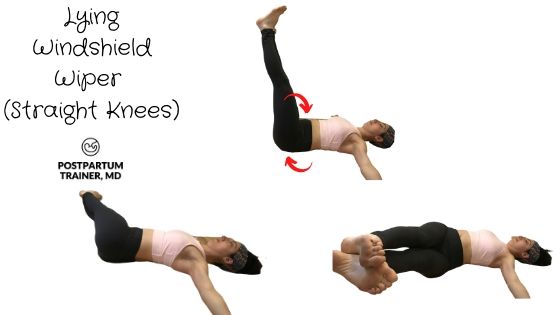
Next up is the full windshield wiper. This exercise is the same as the modified version, except you will keep your knees straight throughout the movement. Be careful not to do this exercise too quickly, and you don’t want your feet touching the floor. As always, keep your core muscles engaged, and aim for eight repetitions per side.
66. REVERSE CRUNCHES
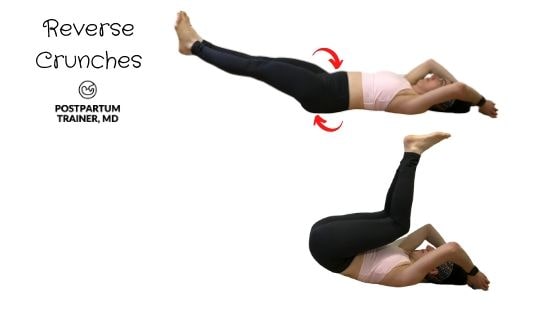
You may feel comfortable performing reverse crunches at this point. Lie on your back in front of a pole or a beam that you can support yourself with (You can also hold onto a dumbbell). Reach overhead to grab the beam and assume a hollow body position with straight knees. From here, curl your knees up toward your chest until your low back comes off the floor slightly. Slowly lower your legs back down to the starting position with straight knees.
67. ONE LEG GLUTE BRIDGE
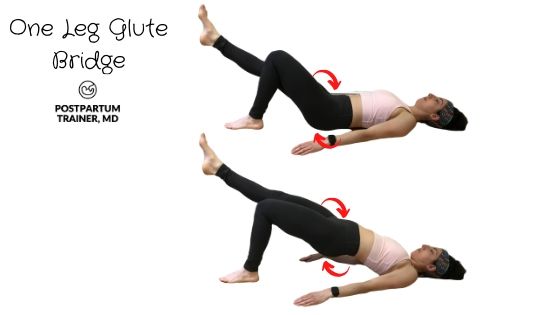
The straight-leg glute bridge is a more challenging progression to the single-leg variation we did in level 2. Lie on your back with your knees bent and feet flat on the floor. Straighten one leg and elevate it off the floor. Keep the other bent on the floor. Tilt your pelvis and squeeze your butt muscles to extend your hips up into the air. Maintain your leg straightened the entire time. If you can’t keep your core engaged, scale this exercise back to an easier variation. Do 6-8 repetitions per side.
68. GLUTE BRIDGE MARCH
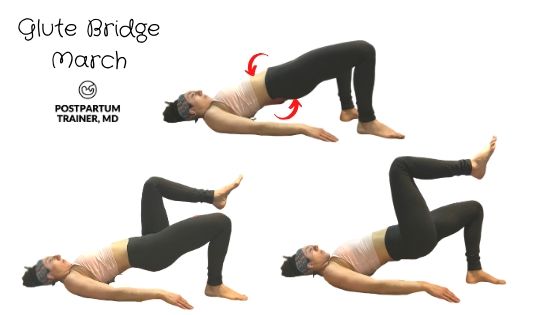
The glute bridge march will challenge your ability to maintain hip extension and a posterior pelvic tilt while activating your legs. Get into a full bridge position to start. Next, bend one knee up toward your chest as high as you can without letting your spine change its position. Slowly return your leg back down and repeat on the other side. Go for eight repetitions per side before letting your butt touch the floor again.
69. FEET ELEVATED GLUTE BRIDGE
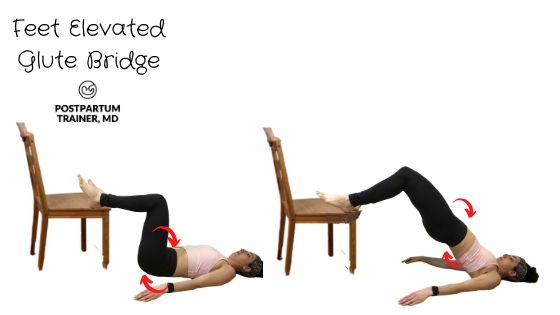
The next glute bridge variation is the feet-elevated glute bridge. This exercise increases the distance you have to extend your hips from. As always, brace your core and tilt your pelvis before every repetition. Hold the top position for a three count before returning back down. You can make this exercise more challenging by doing it one leg at a time.
70. SUPINE LEG CURL
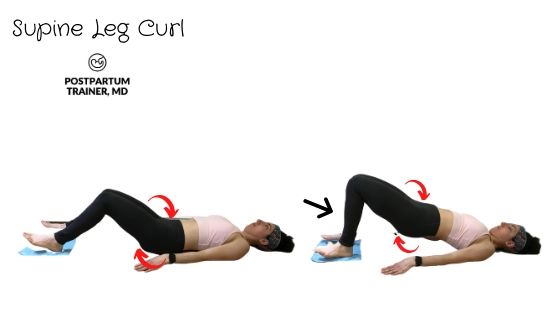
The supine leg curl is the last glute bridge variation that also trains your hamstring muscles. This exercise is great because you are forced to learn how to activate your core while simultaneously flexing your knees. Find a small towel and place your heels on top of it. Tilt your pelvis, extend your hips, and curl your legs to bring your feet towards your butt. Return your feet back to the starting position without bringing your butt back down to the floor. Do not let your low back arch at all. This exercise is fairly challenging. Take your time with it.
Level 3 Exercises While Standing
71. SPLIT SQUAT
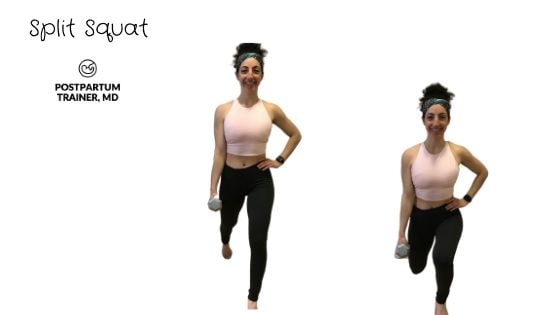
The next exercise is the split squat. This exercise strengthens the legs while simultaneously teaching you how to stabilize your core. Stagger your stance as wide as you can comfortably go. Brace your core and keep your back straight. Begin squatting down until your back knee slightly grazes the floor. Stand back up and squeeze the butt muscle of the back leg. Repeat for eight repetitions per side. To increase the difficulty of this exercise, hold a dumbbell on the side that you’re lunging on.
72. REVERSE LUNGE
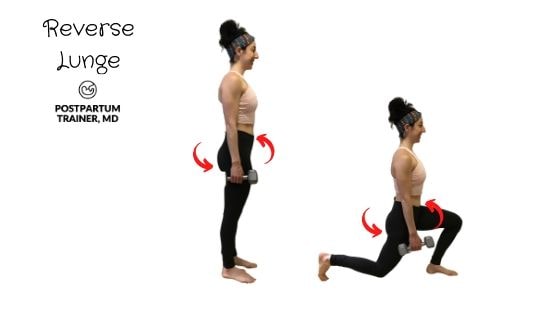
The next exercise is the reverse lunge. Stand tall with your feet close together. Posteriorly tilt your pelvis, and step back as far as you can. As you’re stepping back, begin kneeling to allow your back knee to graze the floor gently. Return to the starting position and do eight repetitions per side.
73. SUITCASE DEADLIFT
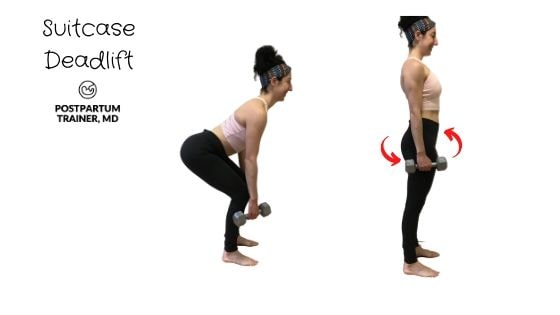
The suitcase deadlift requires you to have access to a moderately heavy dumbbell (which could be purchased on Amazon) or some other form of external resistance. Place the weight on a platform at your side so that it is at a mid-shin height. Bend at your hips by pushing your butt back and keeping your spine straight. Grab the dumbbell and brace your core. From here, all you’re going to do is stand up with the dumbbell. This exercise presents a significant uneven load to your core, strengthening your ability to resist lateral bending. Slowly lower the dumbbell and repeat for eight repetitions per side.
74. STEP UP

The step-up is one of the more challenging core exercises despite its deceptively simple appearance. Find a chair that is at the level of your knee to mid-thigh and place one foot on the chair. Next, posteriorly tilt your pelvis and brace your core. Begin leaning forward onto the chair while keeping your back straight until you feel your back leg coming up off the ground. Continue pressing through your front foot until you reach full extension at the top. As always, an uneven load will increase the effectiveness of this exercise.
75. SINGLE-LEG ROMANIAN DEADLIFT
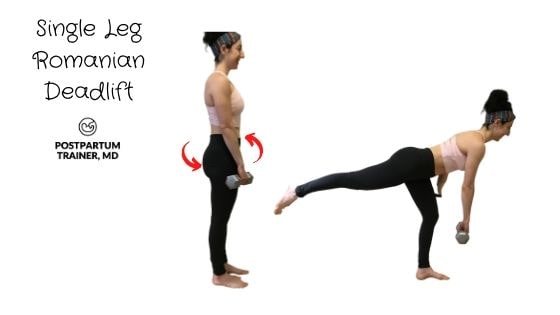
The next single-leg exercise you will perform is the Romanian deadlift. This exercise requires a great deal of balance and core strength to maintain stability. You will need a dumbbell or a light dumbbell for this exercise. Lift one foot off the ground and balance yourself on one leg. Maintain a slight bend at the knee of the working leg. Begin bending at the waist and pushing your butt back while keeping your spine neutral. You will feel a big stretch along your hamstring muscle. Reverse the movement by squeezing your glutes. Do eight repetitions per side.
76. WARRIOR BALANCE ON 1 LEG
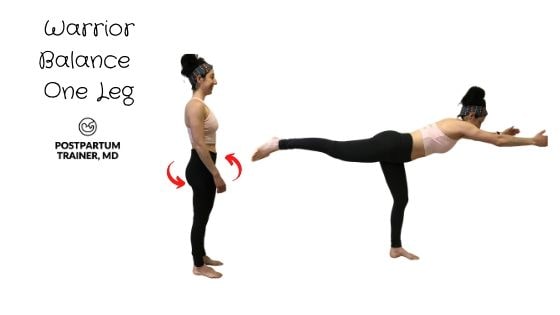
This yoga pose incorporates balance, posture, and core strength all at once. Stand with your feet together and balance yourself on one leg. Next, raise your foot back behind you with a straight knee as you let your torso become parallel with the ground. Raise your arms overhead so that they, too, can be parallel with the ground. Hold this position for 15 seconds and switch sides.
77. FOOT ELEVATED SPLIT SQUAT
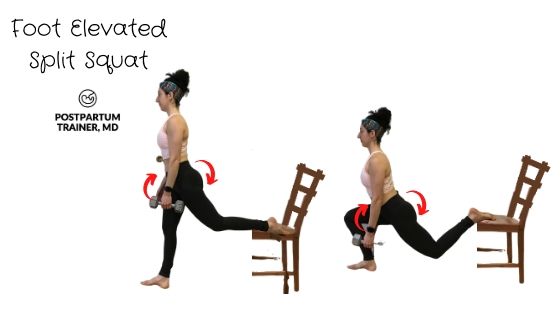
The foot-elevated split squat is a great exercise that helps you develop many levels of strength. It strengthens the leg muscles, improves hip mobility, and develops core stability and balance. Find a chair or a box that you can rest your back foot on. Step far away enough from the chair so that you make a 90-degree angle with your hips and knees when at the bottom of the exercise. Squat down until you feel a nice stretch along the front side of the back thigh. You probably won’t be able to make contact with your knee and the floor. Holding a dumbbell will further increase the demands of the exercise.
78. SINGLE-LEG BOX SQUAT
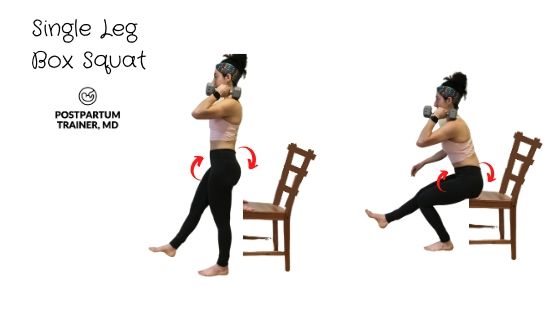
To finish off the single-leg standing exercises, you will perform box squats. This exercise increases the difficulty of the squat by forcing you to balance on one leg. This balancing component is what will activate and strengthen the deep muscle fibers of your core. Stand 6 inches from a chair or a box and balance yourself on one foot. Slowly squat down until you are sitting on the box. Pause for one count and push back up to a standing position. Keep your core engaged throughout the movement. Do six repetitions per leg. To make the exercise easier, use a taller box.
79. INCLINE PLANKS
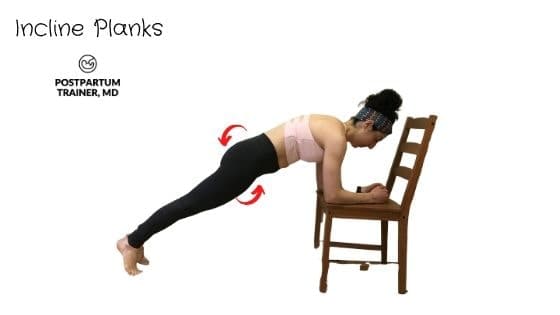
The incline plank is similar to the wall plank, but instead, you will be doing it on a high chair. Remember that you must be able to maintain a posterior pelvic tilt while engaging your core. If this places too much stress on your rectus, then skip it.
Level 3 Exercises On Your Side
80. SIDE PLANK LEG ABDUCTIONS
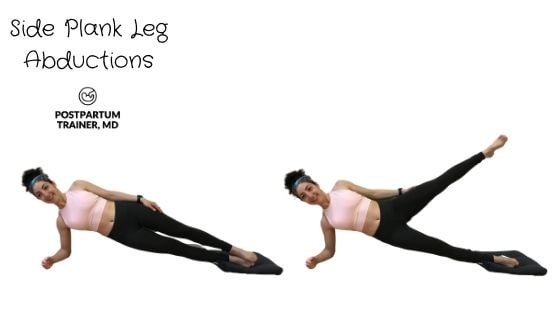
The level 3 side plank exercises are really going to challenge your oblique muscles as well as your balance. Get into a full-side plank position with a neutral spine and core activated. From here, lift your top leg up toward the sky. Hold this position for 3 seconds before returning your leg back down. Perform six repetitions per side.
81. STAR SIDE PLANKS
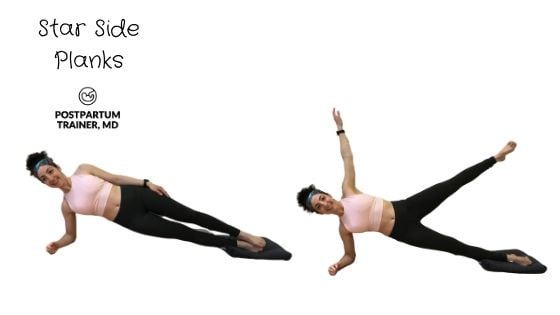
This next exercise is pretty cool. Get into a full side plank with an extended arm. Stack your feet on top of each other to get into the starting position. From here, lift your top arm directly up toward the ceiling while simultaneously abducting your top leg. Hold this position for 3 seconds before returning to the starting position. Aim for six repetitions per side.
82. SIDE PLANK MARCH
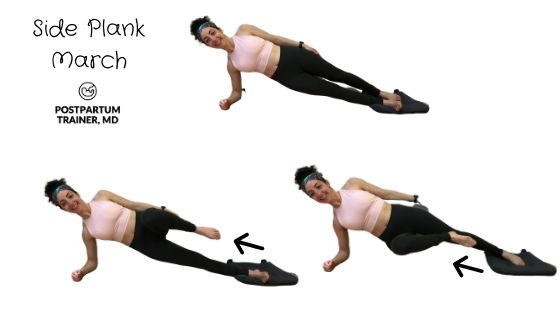
Next up is the side plank march. This exercise adds a dynamic and balance-focused movement to this already challenging exercise. Take your time with this one. Assume a full side plank on your elbow. Stagger your feet so that the top leg is in the back. Begin bending your top knee up toward your chest and hold for a one count. Reverse the movement and then repeat with the bottom leg. Do 8-10 repetitions per side.
83. SIDE TO SIDE PLANK
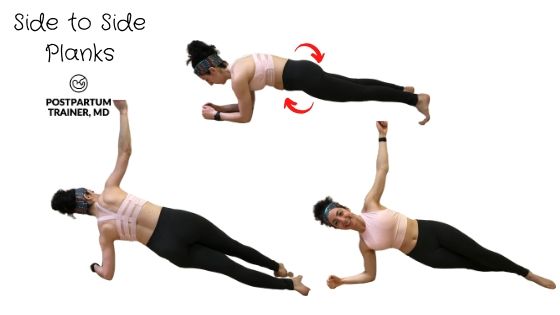
The side-to-side plank is the first time that you will be performing a full plank for a fraction of a second. I have kept this exercise until level 3 because it is important that you know how to use your core properly before doing planks from the floor. In this exercise, you are going to transition from one side plank to the other side using the full plank in between. Do not let your hips sag, nor should you pike your hips up. If this exercise is too challenging, you can do it with bent knees.
Level 3 Exercises On Your Knees
84. MODIFIED PLANK WITH BENT KNEE
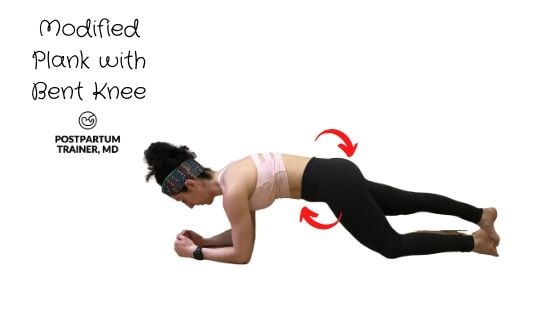
You are now ready to begin the modified floor planks. We aren’t going to do a full plank just yet. Get into a plank position with your forearms set at shoulder width. Posteriorly tilt your pelvis and flatten your back. From here, place one knee down on the floor. Do not let your stomach bulge out or let your low back arch. Hold this position for 15-20 seconds and switch sides.
85. MODIFIED PLANK BALANCE ON TIPPY TOES
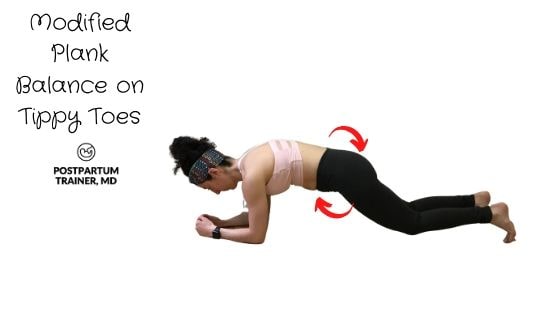
The next exercise is going to get you closer to the full plank. To do the modified plank balance, assume a modified plank with bent knees, as you did in the last exercise. From here, get on your tippy-toes, so your knees are no longer in contact with the floor. Keep your core braced, and maintain a flat back throughout the exercise. Hold this position for 3 seconds and bring your knees back to the floor. Repeat for time.
86. MODIFIED PLANK SHOULDER TAPS
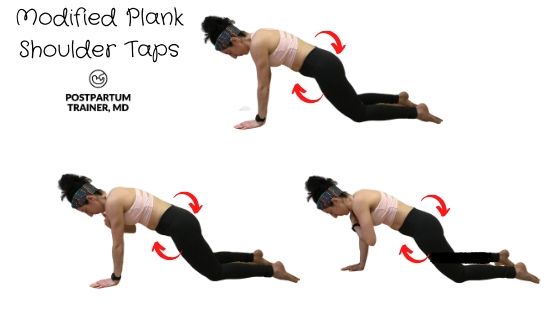
Next up is the modified plank shoulder tap. Get into a push-up position with your hands shoulder-width apart. Place your knees on the floor, posteriorly tilt your pelvis and brace your core. Next, pick one hand up off the floor to tap your opposite shoulder. Slowly return your hand back to the floor and repeat with your other hand. Doing a push-up is optional. Do not let your hips sag or your pelvis rotates throughout the exercise.
87. MODIFIED MOUNTAIN CLIMBERS
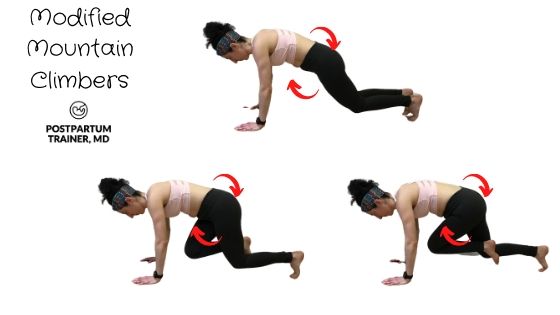
I love mountain climbers. But before we can do the full version, you need to get comfortable with the modified variation. Get into a push-up position on your tippy-toes with both knees bent. Keep your back flat and your core tight. Next, bring your bent knee up toward your elbow. Don’t worry if you can’t make contact. The most important part is that you do not let your hips sag or let your spinal alignment change. Repeat on the opposite side. As you get comfortable, you can do this exercise dynamically as if you are running.
88. THE MODIFIED UP AND DOWN PLANK
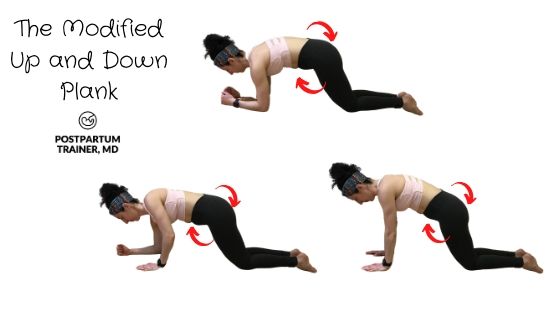
The up-and-down plank is a great exercise that adds a dynamic component to the plank. But to prepare for it, we will do it from a modified position on your knees. To do it, you will alternate between a push-up position and a forearm plank. At no point should you let your hips sag or your low back arch. It is also important that you do not rotate the hips excessively. As always, keep your core braced and your pelvis tilted.
89. SITTING OVERHEAD HOLDS
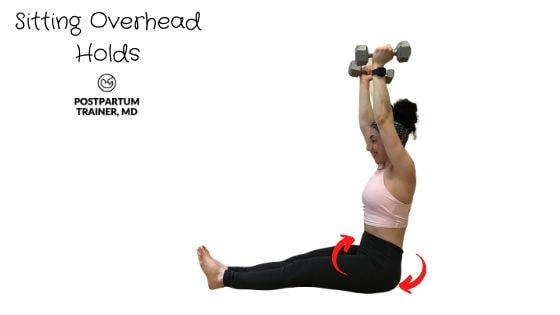
This exercise is a lot more challenging than it looks. You will need two dumbbells or any kind of weight to do this exercise. Sit on the floor with your legs straight and your spine tall. Bring the dumbbells up overhead and maintain this position for as long as you can. Don’t forget to breathe throughout this exercise.
Congratulations! You have come so far in improving your core strength and closing up your diastasis.
But guess what?
There’s more. Below you will find some bonus Level 4 exercises.
Are you up for the challenge?
Bonus: Level 4 Diastasis Recti Exercises:
These last few movements are the most challenging core exercises. I do not want you to perform them until you feel confident that you have a strong midsection and you have noticed a lot of improvement in your diastasis. If you still have more than two fingers of separation, do not perform these exercises.
90. BEAR CRAWLS
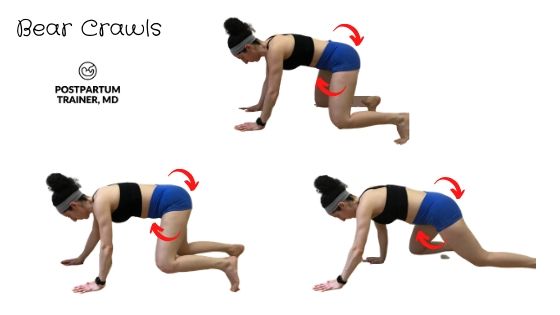
The bear crawl is a simple exercise that challenges your ability to maintain a tight core while moving. Kneel down into a quadruped position with a flat back, and your core braced. Next, get onto your tippy-toes as you did for the plank balance. This is the starting position. From here, begin walking forward while maintaining your back parallel to the floor. Always walk using contralateral limbs (i.e., Step forward with your right leg while moving your left arm). Make sure that your core is always turned on and that you do not rotate at the hips.
91. HOLLOW BODY ROCKS
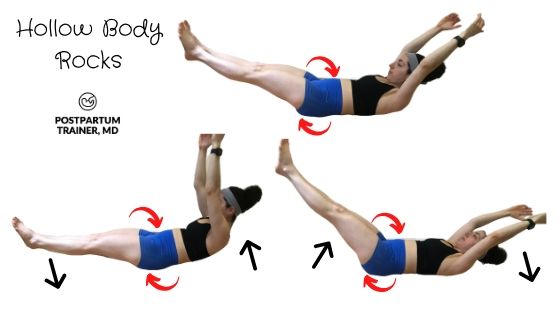
The hollow body rock adds a dynamic component to this already difficult exercise. Assume a hollow body position with your arms overhead by your ears. From here, begin rocking back and forth in a smooth, controlled manner. Try to keep your arms by your ears at all times, and do not let your feet touch the ground. Only rock as much as you can maintain a posterior pelvic tilt.
92. THE V SIT HOLD
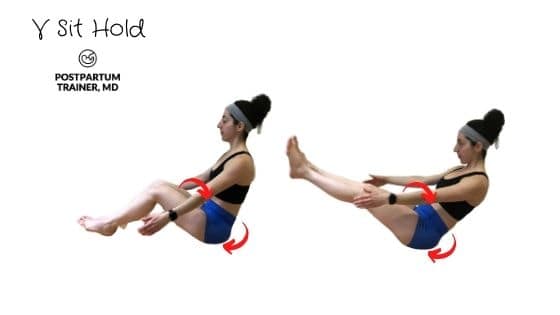
To do the v-sit hold, sit on the floor with your back straight and your knees bent. From here, lean slightly back without changing your spinal position. Next, slowly lift your feet and hands off the floor to balance yourself. Make sure that your core is as engaged as possible. Bringing your hands out in front of you can make the exercise easier. Additionally, you can also bend your knees if this move is too challenging.
93. MOUNTAIN CLIMBERS
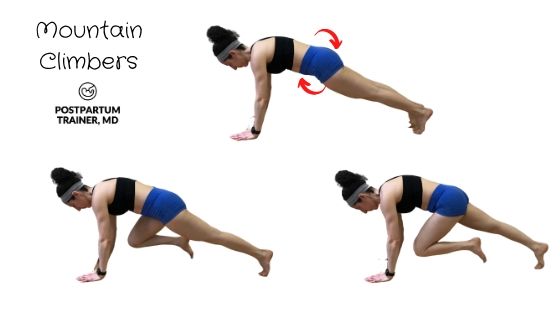
You should be familiar with mountain climbers at this point. Instead of doing them from a wall or an incline, you will do them from a push-up position. The exercise is still the same. Keep your pelvis tilted and try to maintain as neutral of a spine as possible. Do not worry if you cannot make contact between your knee and elbow. Do this exercise with a fast cadence, as if you are jogging.
94. CROSS-BODY MOUNTAIN CLIMBERS
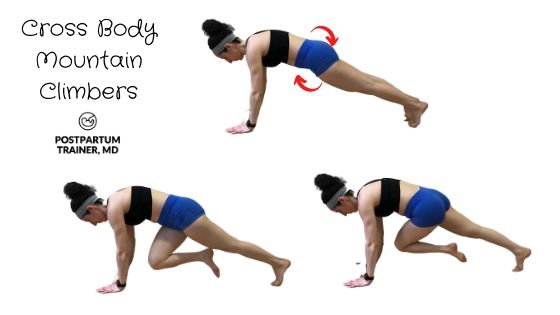
The cross-body mountain climber incorporates more oblique work than the traditional mountain climber exercise. Try to bring one knee to the opposite shoulder while keeping your back neutral. It’s okay if you cannot make contact between your knee and elbow. All of the same cues apply.
95. PUSH-UP SHOULDER TAPS
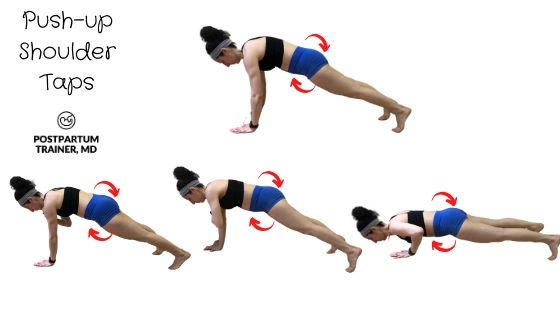
The push-up shoulder tap picks up where the incline and modified shoulder tap left off. This time, you’ll be performing this exercise from the floor and incorporating full push-ups in between reps. As always, keep your core engaged and your spine neutral. If this exercise is too challenging, you can elevate your hands on a short platform.
96. THE UP AND DOWN PLANK
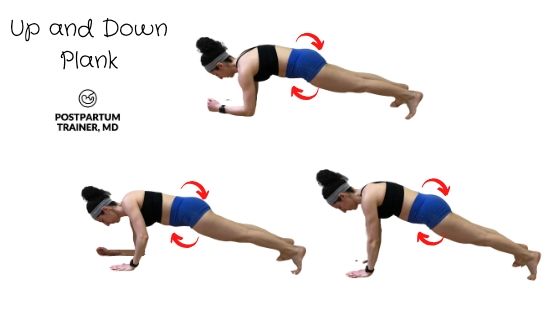
The up-and-down plank will really challenge your core and stability strength. Assume a forearm plank position with your back flat and core engaged. Next, begin to extend your left elbow, followed by your right elbow. You will now be in a full push-up position. Next, you will go back to the forearm plank position by bending your left elbow, followed by your right elbow. Keep your hips and back as stable as possible. Continue alternating between a forearm and push-up plank for the desired time. If this exercise is too challenging, you can do the modified up-and-down plank shown in level 3
97. THE 3 LIMB PLANK
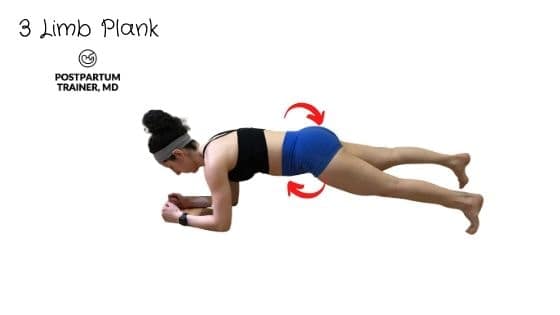
Now that you are strong enough to hold a plank without letting your hips sag, it’s time to increase the difficulty of the exercise. Assume a full plank position with your back straight and your pelvis posteriorly rotated. Next, pick up one leg off the floor, keeping your knees straight. Do not lift your leg too high, as you don’t want your low back to arch. Hold this position for a three count and then repeat with the opposite leg.
98. THE 2 LIMB PLANK
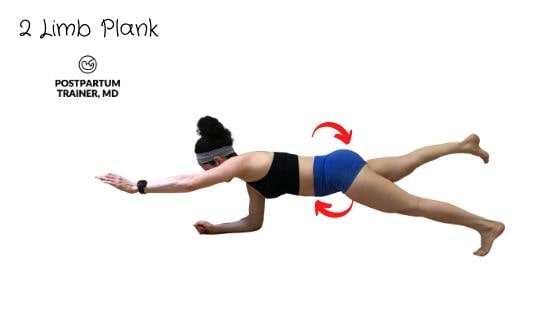
Once you’re comfortable with the three-limb plank, you can move on to the two-limb plank. Lift one leg off the ground while simultaneously lifting the opposite arm off the ground. Hold this position for a three count and repeat on the opposite side.
99. AB SLIDES
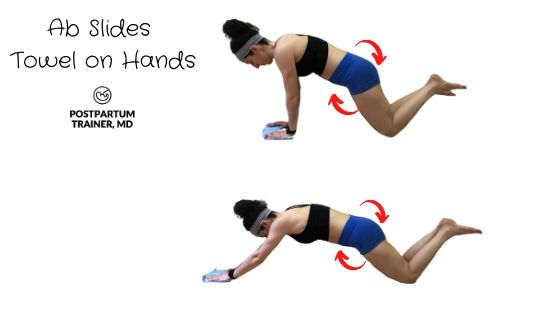
The ab slide is a challenging exercise that is reserved only for moms that have mastered all of the above exercises. Get into a quadruped position and place a towel on the floor for your hands. Next, posteriorly tilt your pelvis, and keep your back neutral. While maintaining spinal alignment, slide your hands forward with your elbows locked. This will bring your upper body closer to the ground. Only go as low as you can maintain your spinal position. Return back to the starting position slowly and repeat. Alternatively, you can do ab wheel rollouts. If you develop any low back pain or cannot maintain a neutral spine, then stop.
100. PLANK WALKOUTS
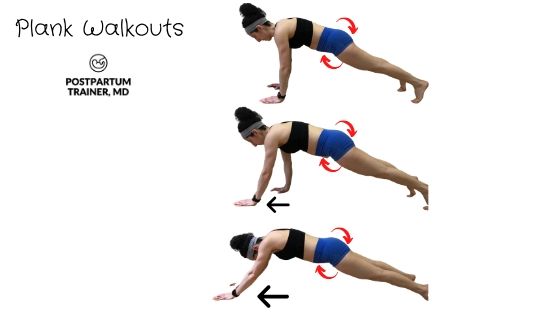
Last but not least, we have the plank walkout. The plank walkout is a very challenging exercise that is similar to the ab slides. Instead of doing it from your knees, you will start in a full plank position on your hands. And instead of relying on a towel, you will do all the work. From a full plank position, begin walking your hands forward. Do not let your hips sag nor swing from side to side excessively. Walk out as far as you can while maintaining a neutral spine and a posterior pelvic tilt. Over time, you should be able to reach a point where you can bring your face close to the floor.
Good luck!
Related Questions
What is diastasis recti?
Diastasis recti is a condition where the rectus abdominis muscles separate at the midline. The separation is due to a weakness of the linea alba, the connective tissue that holds the rectus muscle together.
In general, separation of about 2 cm or more (~ two finger widths) is abnormal (source).
Check out my post on how to tell if you have diastasis recti for a simple way to see if you have the condition.
The good news is there are so many safe and effective exercises for strengthening and rebuilding the muscles of your abdomen.
The key is to do exercises that strengthen:
- the deep, transverse abdominis muscles,
- the obliques,
- and the pelvic floor muscles
Can it be fixed with exercise?
Diastasis recti can be improved with exercise– though in some cases, it may not completely heal with abdominal exercises alone.
Either way, it is important that you begin strengthening your core after delivery, as the connective tissue holding your abdominal muscles in place has weakened significantly during pregnancy.
The good news is the exercise program above is a safe and low-risk intervention you can try to close your gap.
As always, be sure to speak with your doctor before doing any type of exercise.
Does it ever heal on its own?
There is some evidence that diastasis recti can heal on its own. One study found that half of the postpartum women had resolution of their diastasis six months postpartum.
Either way, I still recommend that you strengthen your abdominal wall after delivery, as it is common to develop a weak core throughout pregnancy.
Can planks worsen diastasis recti?
It is possible that planks will worsen your diastasis recti as this exercise places a lot of pressure on your abdominal wall and rectus abdominis muscles.
Thankfully, there are several plank regressions you can do to begin strengthening your ab muscles safely in the postpartum.
What is the fastest way to heal diastasis recti?
Unfortunately, there is no concrete way to know how long it will take to heal diastasis recti. Healing your separated abdominal muscles takes time.
It’s important that you give yourself at least six months to see results.
So what should you do in the meantime?
- Try to lower your body fat percentage and obtain a healthy BMI
- Perform core strengthening exercises (which can also help with symptoms of pelvic floor dysfunction)
- Avoid heavy lifting
- Be patient
Final Words on Healing Diastasis Recti
There you have a complete list of the best diastasis recti exercises.
To recap:
Healing an abdominal separation will require a combination of different therapeutic exercises.
This includes exercises that teach you how to activate your abdominal muscles while
- standing,
- using your arms,
- using your legs, and
- moving from point A to point B
Dedicate 15 minutes a day, four days a week, and you will see big improvements in your core strength and diastasis separation.
Now I want to hear from you.
Which exercises are you most excited to try?
Are you ready to build yourself a diastasis recti workout?
Comment below and let me know.
Other Related Posts
- Diastasis Recti After C-Section {Everything You Need To Know]
- How Long Does it Take to Heal From Diastasis Recti? [The Honest Truth]
- How To Prevent Diastasis Recti (And Which Exercises To Avoid)
Get Four Free Workouts To Help Strengthen Your Pelvic Floor & Heal Your Mommy Tummy!
Brittany Robles, MD, MPH, CPT
Brittany Robles is a full-time OBGYN physician, a NASM certified trainer, and a prenatal and postnatal fitness specialist. She holds a Master of Public Health degree in maternal health with a special interest in exercise and nutrition. She is also the co-author of The White Coat Trainer. Learn more about her here.
Sharing is Caring – Send This To A Mom In Need!
References to studies:
1. Qu E, Wu J, Zhang M, Wu L, Zhang T, Xu J, Zhang X. The ultrasound diagnostic criteria for diastasis recti and its correlation with pelvic floor dysfunction in early postpartum women. Quant Imaging Med Surg. 2021 Feb;11(2):706-713. doi: 10.21037/qims-20-596. PMID: 33532270; PMCID: PMC7779936.
2. Michalska A, Rokita W, Wolder D, Pogorzelska J, Kaczmarczyk K. Diastasis recti abdominis – a review of treatment methods. Ginekol Pol. 2018;89(2):97-101. doi: 10.5603/GP.a2018.0016. PMID: 29512814.
3. Fernandes da Mota PG, Pascoal AG, Carita AI, Bø K. Prevalence and risk factors of diastasis recti abdominis from late pregnancy to 6 months postpartum, and relationship with lumbo-pelvic pain. Man Ther. 2015 Feb;20(1):200-5. doi: 10.1016/j.math.2014.09.002. Epub 2014 Sep 19. PMID: 25282439.
Hi,
I love the exercises and this helped me to be more careful and know which one I can do depending on my muscle strength.
I purchased the PDF book with the exercise and I haven’t received anything in my email.
Please, can send the PDF so I can print it?
Thanks,
Renata
Hi Renata
The download link to the PDF was in the original email during the checkout. I just sent you an email with the link.
Hello I have a question, can you do these excersises with Diastasis Recti? a lot of theses excersies makes my belly bulge I thought that was BAD. what should I do?
Hi Wendy, thank you for your question. You can absolutely do these exercises with diastasis recti however I would avoid the ones that worsen your bulge. Try the level 1 exercises and slowly work your way up. If any exercise causes pain or discomfort avoid it.
I purchased the PDF, can’t download it nor did I recieve an email?
Hi Amber, I sent you an email.
Brittany
Thank you so much for this! I wish every woman could get ahold of this guide. So glad I found your website 🙂
Thank you so much for the comment Holly! I am glad you found this guide helpful. 🙂 Best of luck with everything!
Hi,
Thanks for all of these great exercises! I have a few questions I was hoping you could help me with.
1. When I do each exercise, should I first be doing an abdominal brace and also be doing a posterior pelvic tilt?
2. Should I be pulling in my pelvic floor muscles when I do an abdominal brace and when I brace to do each subsequent exercise, or should I just brace my abdominal muscles?
3. When you mention holding positions of exercises (for 5 seconds, for example), should I be breathing while holding? If so, what type of breathing should I be doing?
Thanks for your help!
Hi Adrienne,
Thank you so much for the comment!
To answer your questions:
1. Yes you should do an abdominal brace and posterior pelvic tilt before each exercise.
2. It is not required, but yes otherwise this is a great thing to do as you can strengthen the pelvic floor muscles as well as your core.
3. Yes you should definitely breathe during the exercises- focus on abdominal breathing and not chest breathing.
I hope this helps!
Awesome! Thanks so much for your quick response :).
hi
i love your site, the most complete ever.
i am confuse between 2 actions that I should often do.
suck in my belly button to my spinal (not too much muscle contracting there, or at least it doesn’t feel so…) or tighten my abs (lots of muscle contraction)?
Hi Samuel,
Thank you so much for your comment, and I am glad you are finding the site helpful!
I think you are referring to stomach vacuums when you say sucking in your belly button to your spinal cord. This exercise is beneficial but you could also combine it with the posterior pelvic tilt.
When performing these exercises you could incorporate an element of both vacuuming plus contracting your abdominal muscles so that your core is fully engaged (as almost all the exercises require you to do some type of posterior tilt).
Yeah, I definitely think the e-book could benefit you as it gives you a step by step progression in the 6 week workout.
Can this help woman 30 yes past children?
Hi Melanie,
Yes definitely.
It is never too late to rebuild your core.
Good luck!
I am 55 adult male, good shape and general good health that recently diagnose myself with DR.
I am not sure if it is wrong exercising, wrong exercising or even both.
would you say that your wonderful booklet is for me too or at least a part of it?
giving my age, do I stand a chance of healing from DR?
thanks a lot
* wrong exercising, over exercising or even both.
I am 18 months post partum and I have done months of Diastsis Recti friendly ab workouts.. I am so ready to be able to do regular core workouts again but realize they could make the separation worse. The separation has not closed at all.
Is there any hope for me? 🙁
Hi Victoria,
Thank you so much for your comment and congratulations on the birth of your baby!
To be honest, everyone is different and the amount of closure you will get will vary from person to person. With that said you are definitely taking steps in the right direction by doing diastasis recti friendly exercises. I would recommend that you start to work your way up to the harder progressions listed on this page and see how you feel and also how your core is handling it. There is certainly hope!
Dr. Robles,
I am 2 years PP and just realized that I have DR. I have been doing beachbody exercises for 6 weeks now and I am hoping and praying that I didn’t make things worse. How would I know if my DR is worse? With me being 2 years PP can I still do these exercises? Do I need to start at level 1 to see progress or can I skip to level 3 since I have been doing 3 weeks of pilates and didn’t realize I wasn’t supposed to?
Thanks!
Hi Rebekah,
Thank you so much for your comment.
The way in which you could worsen your diastasis recti is by making the abdominal separation bigger. If you are unsure of the size of the diastasis prior to working out it may be difficult to know if the separation has worsened.
When trying to rebuild your core and fix your diastasis, it is best to start low and go slow.
Start with beginner exercises and make sure they do not cause pain or cause your abdomen to bulge excessively.
I would recommend starting at level 1 and see how you do. You could always progress through them quicker rather than have to regress from level 3.
Hope this helps!
Hi! I am definitely getting your PDF guide and cannot wait to start as I have tried workouts on my own for DR but I have not found a complete guide like the one that you are offering so I am very thrilled to get started.
I have a hernia that is right above my belly button as well as a 2 finger wide DR and I am 2 almost three 3years PP. Are these exercises good to do with a hernia that is located right on top of my belly button. It is not painful unless I eat until my stomach hurts therefore I have chosen not to have surgery but I have often heard that it is better to have surgery to fix the hernia before attempting to fix the DR. Is this true?
Thanks for any advice 🙂
Hi Alexis
Thanks for your comment. Unfortunately, I wouldn’t be able to give advice specifically on that- I would defer to your doctors and what they recommend. I would show the exercises to your doctor and see if they think that they would be safe for you to do given how much of a hernia you may have!
Hi! I am 72yrs. young would this guide help with my DR? Got it about a year ago. Hey! once downloaded how do I get the guide spiralized.
Thanks Much
Tom
Hi Tom,
Thank you for your comment!
Yes this guide will help with your diastasis recti as it will help to strengthen your core muscles.
Once the book is downloaded and printed, feel free to take it to any office department store like staples, office max, etc to have it spiralized.
Hope this helps!
Do you have any specific exercises for men that have this issue, not related to postpartum. I am 70 years old.
Hi Thomas,
Thank you so much for your comment.
These exercises are neither gender nor age specific 🙂
All of them can be used to rebuild and strengthen the core!
Hope this helps!
Hi, I have diastasis and I want to focus on reduce my breast size. Is there a specific excercise that could help? Thank you very much
Hi Dennys,
Thank you so much for the comment.
Unfortunately there are no specific exercises that could reduce your breast size. Breast tissue is mostly composed of fat and thus losing weight may help.
If you are interested- I do have a post dedicated to chest specific exercises that you could find here: https://postpartumtrainer.com/chest-exercises-saggy-breasts/
Hope this helps!
Hi Brittany, I had c section and was wondering whether all of these exercises are safe for me or not? Thanks, Sheila
Hi Sheila,
Thank you for your comment.
These exercises are safe for most postpartum women whether you had a c-section or vaginal delivery.
However, with that being said, I always recommend speaking with your doctor before engaging in any exercise as they know you are your conditions best.
Feel free to start with the level 1 exercises and progress as you feel ready.
If anything causes you pain or discomfort stop doing that exercise and try a different one.
Hope this helps!
Hi Brittany,
I have done the level 1 exercises for quite some time now. I have felt comfortable with them and have decided to move onto level 2. I have tried the #35 modified hollow body hold, but I have found that my core cannot successfully hold the exercise without the top of my core/diastasis bulging. This hasn’t happened to me with any of the level 1 exercises. I followed your advice to only slightly raise feet and upper back off of the ground but am still having the same issue. Is there anything else I can do to build up to being able to successfully complete this exercise? Or, is there any other modification I can make to the exercise in order to get some of the same full-core benefits? Thank you for any help you might be able to offer in this regard!
Hi Adrienne, Thanks for your comment. One option is to keep your knees bent. Bend them as much as you need and see if it is still producing a bulge. If not, then skip this movement and continue strengthening all of the other movements!
This is great!!!! So glad to have come across this guide. I am ACE CPT and I have clients who have DR. I needed more ideas than what I know from the top of my head, and your guide is the winner. This will be a staple in my training programs. Thank you for creating!
Hi Ardra!
Thank you so much for your comment and for the support!!
Are superman’s ok for Dias tic Recti? If I am laying on the floor with my belly pressed into the ground and do superman variations how do I know if my stomach is bulging?
Hi B,
Thank you so much for your comment.
It is hard to say if superman’s are okay for diastasis recti. I would suggest looking for other alternatives to train the lower back muscles.
So sad I haven’t seen this guide sooner.
It’s so easy to follow and so many different exercises to keep it interesting.
Happy I found it now though! Also really happy that there are 3 levels!!
Thank you SO MUCH for making this available to everyone for free.
Hi Vanessa,
Thank you so much for your comment and I am so glad you have found this article helpful!!
Hello Brittany,
Iam a mom of twin boy babies, 10 weeks postpartum. I have been wearing abdomen belt from day 2 post delivery. I am able to wear it only for 2 hours a day. Should I do these exercises with my abdomen belt or without the belt? Kindly clarify. Thanks in advance. 🙂
Saranya
Hi Saranya,
Thank you so much for your comment and congratulations on the birth of your twin boys!
When performing these exercises I do not recommend wearing the belt. Feel free to wear it before and after the workout.
Hope this helps!
Hello! Thank you so much for this guide! I was wondering if for diastasis recti if I should stick to only these workouts for 6 months or so or if it was ok to do Barre workouts on top of these?
Thank you again!
Hi Kay,
Thank you so much for your comment.
Definitely stick to the workouts listed here however, if you feel ready for barre workouts go for it.
As always, listen to your body- if anything causes pain or discomfort don’t do it.
Hope this helps!
Wow!!! These are amazing. I have had DR from my 1st born, and I worked on it earlier with the help of youtube videos. Now after my 2nd born, it has re-surfaced and need to start working on it again. Thanks for this detailed guide with instructions. This is just incredible work. Stay blessed.
Hi Raunak,
Thank you so much for your comment and kind words!
Good luck!